How to Alter Oversized Jeans
Finding the perfect-fitting pair of jeans can be a challenge, but don’t despair if you’ve accidentally chosen a size that’s too big. There are several ways to alter your jeans to get that just-right fit. Let’s explore some methods to taper those jeans and get them feeling comfortable and looking stylish.
1 Alter Jeans Waist with Elastic and Safety Pins
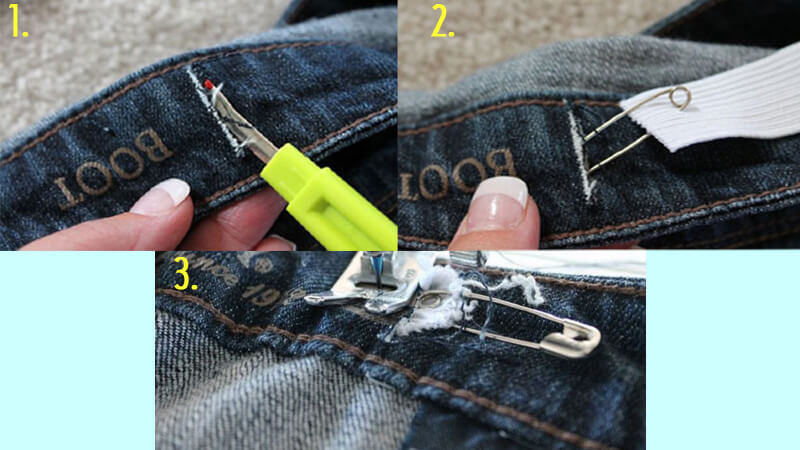 Steps to alter jeans waist with elastic and safety pins
Materials
-
Scissors
-
Needle and thread
-
Safety pinsElastic band
Steps
Try on the jeans to check the fit.
2 Alter Jeans Waist with a Mini Sewing Machine
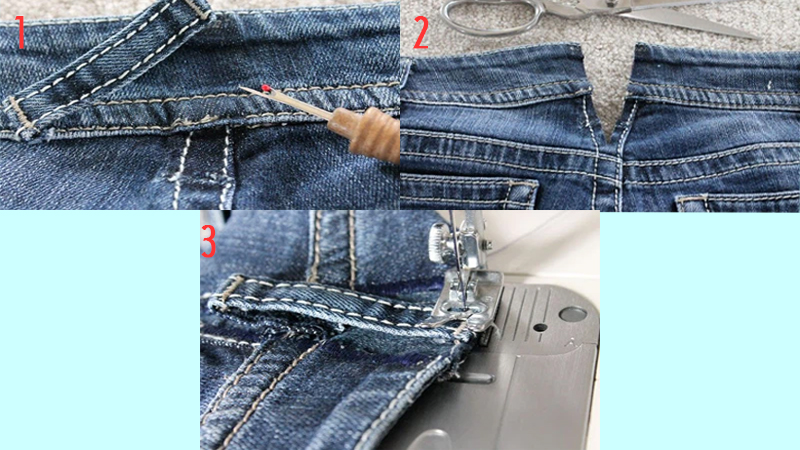 Steps to alter jeans waist with a mini sewing machine
Materials
-
Scissors
-
Needle and thread
-
Mini sewing machine
Steps
Note: Make sure to securely stitch the cut edges to prevent further tearing. Cut the fabric evenly to maintain symmetry.
3 Alter Jeans Waist by Adding Buttons
 Altering jeans waist by adding buttons
Materials
-
Scissors
-
Needle and thread
-
2 jeans buttons
Steps
Note: When you button the jeans, the waist will be taken in on both sides. Be sure to position the buttons accurately to maintain symmetry.
4 Tips for Choosing the Right Size Jeans
Use a Favorite Pair as a Guide
Take a pair of jeans that you love and that fit you well. Lay them flat and use them as a guide to measure and choose the right size.
Lay your favorite pair of jeans on a flat surface. Make sure to smooth out any creases and unzip them.
Carefully measure the length of the waistband, making sure the front and back are even. Double this measurement to get your waist circumference. Take into account the stretch of the denim fabric to ensure an accurate result.
For low-rise or high-waisted jeans, you may need to add or subtract a bit from this measurement.
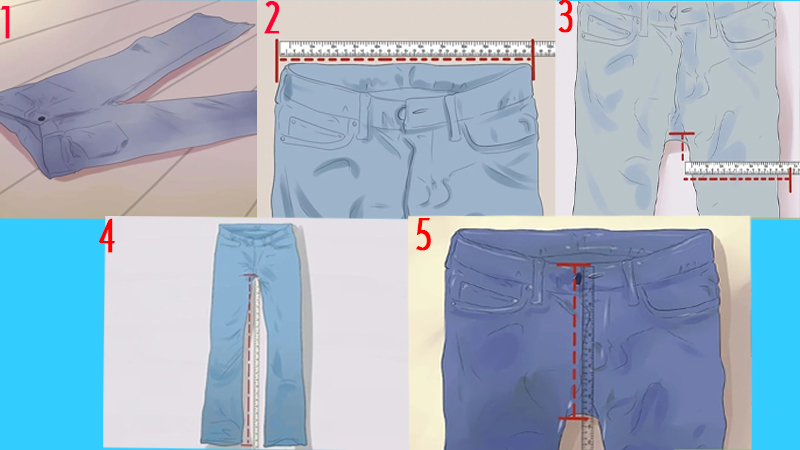 Steps to measure using a favorite pair of jeans
For the most accurate thigh measurement, measure 5 cm down from the crotch. Double this measurement to get the total thigh circumference.
Keep the jeans flat and straight. Measure the length from the crotch to the hem to get the inseam length.
Finally, measure the distance from the crotch to the waistband, both at the front and back.
5 Taking Body Measurements
To choose jeans that fit perfectly, it’s important to know your body measurements and choose the right size accordingly.
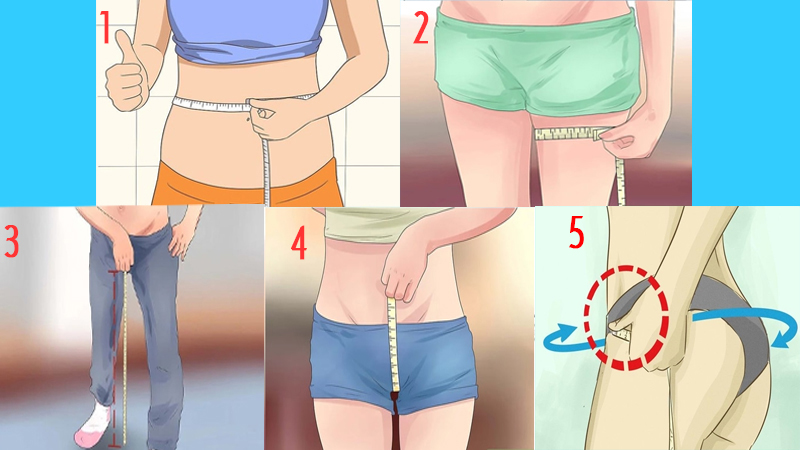 Steps to take body measurements
Use a flexible tape measure. You can move the tape measure up or down, depending on whether you plan to wear high-waisted or low-rise jeans.
Measure the widest part of your thigh. Make sure to measure your thighs and not another part of your leg.
Have someone help you measure from the crotch to the ankle. This will give you the correct inseam length for well-fitting jeans.
Use the tape measure to circle around your waist, going through the crotch. For a more comfortable fit, add a few centimeters to this measurement when choosing a pair of jeans.
For added assurance, take measurements of your knees, hips, and ankle width.
Reference:
The methods described above can help you alter your oversized jeans without having to visit a tailor. You can also apply these techniques to other types of pants to ensure a perfect fit.


