


Non-stick pans are a kitchen staple for many women. However, after a period of use, the non-stick coating of the pan will start to peel off. Don’t rush to throw them away, instead, pocket these tips to restore the non-stick ability of the pan with readily available ingredients.
1. Use potatoes
Ingredients:
+ 1 potato
+ A pinch of salt
Instructions:
+ Step 1: Peel the potato, wash it clean, and cut it in half.
+ Step 2: Sprinkle some salt on the cut surface of one potato half and rub it onto the non-stick surface of the pan to clean it. Use the other half of the potato to rub the bottom of the pan or areas where the non-stick coating is peeling off. Then, rinse the pan with clean water and dry it.
For old pans with a worn-out non-stick coating, food tends to stick more easily and rust may appear after washing. In this case, you can use potatoes to remove the rust, as potatoes contain acid compounds that can clean effectively.

Use potatoes to remove rust as they contain acid compounds that can clean effectively.
2. Use vinegar and cooking oil
You can clean a non-stick pan with vinegar and then coat it with hot cooking oil to restore its non-stick ability. This method is also simple to follow.
Ingredients:
+ Some vinegar
+ Cooking oil
+ A clean sponge
Instructions:
+ Step 1: Wash the pan thoroughly and let it dry.
+ Step 2: Place the pan on the stove, add vinegar, and turn on the heat to warm it up.
+ Step 3: Dip the sponge into the pan and scrub it a few times, then turn off the heat, discard the vinegar, and rinse thoroughly with clean water.
+ Step 4: Put the pan back on the heat and let it dry. Then, pour a little cooking oil and coat it evenly. When the oil is hot, turn off the heat.
+ Step 5: Let the pan cool down, pour out the excess oil, and clean it.
3. Use coconut oil
Using coconut oil combined with salt is an effective way to clean and restore the non-stick ability of the pan.
Ingredients:
+ 1 tablespoon of coconut oil
+ Salt
+ Paper towel
Instructions:
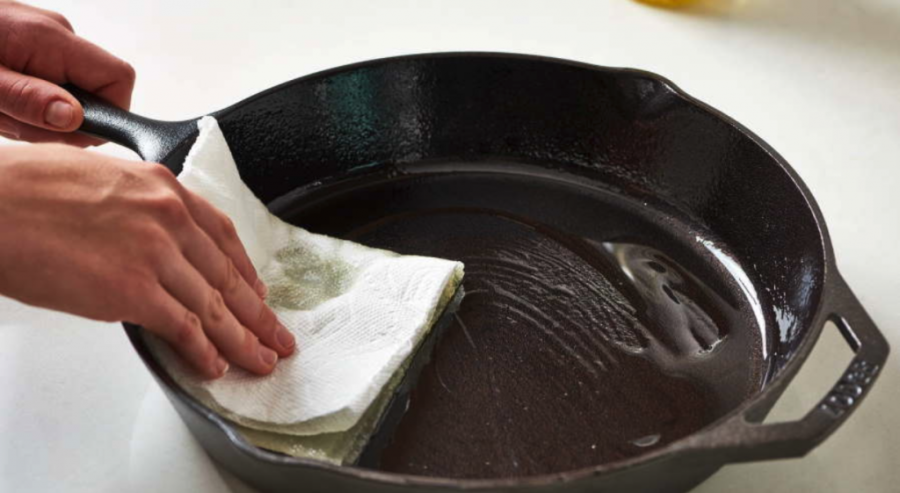
+ Step 1: Place the pan on the heat, add 1 tablespoon of coconut oil, and heat it. Then, spread the oil evenly.
+ Step 2: Let the oil boil for about 2-3 minutes, then pour out the oil and sprinkle salt evenly on the surface of the pan.
+ Step 3: Use a paper towel to scrub the surface of the pan along with the salt a few times. Then, remove all the salt and oil from the pan using another paper towel.
Using coconut oil combined with salt is an effective way to clean and restore the non-stick ability of the pan.
4. Use milk
Fresh milk is a common household item, especially for families with young children. Besides being consumed, milk is also a “savior” that helps rejuvenate the non-stick pan extremely effectively. According to experts, milk contains a type of protein called casein. When heated, this substance will coagulate and form a protective layer on the surface of the pan, helping to restore its non-stick ability like when it was first bought.
Instructions:
+ Step 1: Pour fresh milk (such as Dutch Lady milk, Vinamilk, etc.) onto the pan until it covers the entire surface, boil for about 5 minutes, then turn off the heat. Clean any remaining milk on the pan.
+ Step 2: Continue using the pan as normal, and you will notice that the food will no longer stick or break. After boiling with milk, the non-stick effect of the pan will be completely restored.
This method should only be applied to pans with a moderately worn-out non-stick coating. For pans with extensive peeling, the results may not be significant.
Many people have a habit of storing eggs on the refrigerator door to save space inside the fridge. This practice seems correct but turns out to be a mistake.
Eggs are a popular food due to their “delicious, nutritious, and affordable” criteria, and are stored in large quantities in every household. Many people have a habit of storing eggs on the refrigerator door to save space inside the fridge. This practice seems correct but turns out to be a mistake. Let’s hear the explanation from experts.
Mistake when storing eggs on the refrigerator door
The refrigerator door is where most people store eggs, but according to experts, this is not suitable. Experts say that the refrigerator door is the most unstable area in terms of temperature, with frequent temperature changes due to the opening and closing of the refrigerator. If stored in this location, eggs will become more prone to spoilage. In addition, the frequent opening and closing of the door also exerts a force on the trays, causing the eggs to shake and reducing their quality.
The best way to store eggs is to place them in specifically designed trays, close the lid tightly to prevent them from absorbing the odor and taste of other foods in the refrigerator. The tray/egg box should be placed in the middle or deeper part of the refrigerator as the temperature needs to be consistently below 20 degrees Celsius.
Alternatively, freshly laid chicken eggs always have a layer of pinkish bloom. This is a protective layer that prevents bacteria from entering. When this bloom is present, eggs used for incubation will have a high hatching rate. However, even with this bloom, poultry eggs are laid through the same path as feces, so there are many types of bacteria. For example, duck eggs or goose eggs contain a lot of salmonella bacteria, which can cause a high rate of poisoning. Therefore, with eggs purchased from supermarkets or the market for food purposes (not for incubation), housewives need to clean the eggs before storing them in the refrigerator.
Health and nutrition experts suggest that if you do not wash the eggs before storing them in the refrigerator, it will be the source of bacterial infection. If you buy them from local markets, it is best to rinse them quickly, preferably with a diluted saltwater solution, or you can wash them with clean regular water and then dry the eggs, and put them in the refrigerator. For eggs bought from supermarkets, they have already been cleaned, so there is no need to clean them again.
How to determine fresh and high-quality eggs:
– Observe the eggshell:
With this method, you only need to use your eyes to look at the shape, color, and transparency of the eggshell. Fresh and high-quality chicken eggs will have intact shells, not shiny, and will have a powdery white layer similar to dew, with bright colors. On the other hand, processed and industrially packaged eggs will not have this powder layer. Low-quality chicken eggs may have cracked or dented shells, or have leakage, or show signs of seepage on the shell like a damp wall corner.
In addition, fresh and high-quality eggs will have a slightly rough shell. When held in hand and gently shaken, there will be no feeling that the yolk and egg white inside are moving and sliding, similar to the case of used eggs.
– Listen to the sound:
Hold the egg in your hand, gently tap two eggs together, or gently shake them and listen to the sound they make. Fresh and high-quality eggs, when tapped together, will produce a crisp sound, and when gently shaken, there will be no sound. In contrast, low-quality eggs, when tapped together, will produce cracking or hollow sounds. If shaken gently, you will feel movement or hear slight noises inside. The older the eggs are, the more you will feel like there is liquid moving inside them.
If the above methods still do not allow you to differentiate, you can use your nose to distinguish between fresh and spoiled eggs. With this method, you can hold the eggs close to your nose and smell the odor. Fresh and high-quality eggs will emit a pleasing aroma similar to eggshells. On the other hand, low-quality eggs may have a slight musty smell or smell sour or rotten.
To clean a non-stick pan effectively, you can use potatoes. Cut a potato in half, sprinkle salt on one half, and rub it onto the non-stick surface to clean and remove any residue. For more worn-out pans, you can also use the potato to rub the bottom of the pan and areas where the coating is peeling off. Rinse the pan with clean water and dry it afterward.
Potatoes are a great natural solution for removing rust from your non-stick pan. Potatoes contain acid compounds that can effectively clean and remove rust. Simply cut a potato in half and rub it onto the rusty areas of the pan. You can also use vinegar and cooking oil to clean and restore the pan’s non-stick ability.
Coconut oil is an effective option for restoring the non-stick ability of your pan. Heat a tablespoon of coconut oil in the pan, spread it evenly, and let it boil for 2-3 minutes. Pour out the oil and sprinkle salt on the surface of the pan. Scrub the surface with a paper towel, and then remove the salt and oil residue with another paper towel.
Yes, milk is an effective and surprising solution to rejuvenate your non-stick pan. Fresh milk, such as Dutch Lady or Vinamilk, contains a protein called casein, which forms a protective layer on the pan’s surface when heated. Simply boil milk in the pan for about 5 minutes, turn off the heat, and clean any remaining milk. Your pan’s non-stick effect will be significantly improved.
The best practice is to store eggs in specifically designed trays with tight-fitting lids to prevent odor absorption. Place these trays in the middle or deeper part of the refrigerator, where the temperature is consistently below 20 degrees Celsius. Avoid storing eggs on the refrigerator door, as this area is unstable in terms of temperature and can cause eggs to spoil more quickly.
Fresh and high-quality eggs will have intact shells that are not shiny, with a powdery white layer similar to dew. The eggs should also have bright colors. When shaken gently, there should be no sound or movement, indicating the yolk and egg white are firm. Additionally, tapping two fresh eggs together will produce a crisp sound. In terms of smell, fresh eggs will emit a pleasing aroma similar to their shells.
How Often Should Women Replace Non-Stick Pans?

With non-stick pots and pans still being widely used despite their decreased effectiveness, many are wondering: Could this have an impact on people’s health?
How to Extend the Life of Your Non-Stick Pan

In this article, we discuss how to ensure optimal use and maintenance of your non-stick pans for a lengthy lifespan. While non-stick pans may be a bit pricey, proper user handling and regular maintenance are necessary for continued quality and optimal performance.
7 Simple Steps to Fry Fish Without Sticking to the Pan

Are you searching for a way to create a delectable fried fish dish? Look no further! We have a helpful tip that will ensure your fish cooks perfectly without sticking to the pan.
Are You Making a Huge Mistake by Storing Eggs in this Fridge Spot? Switch It Up Before Your Eggs Go Bad!

Apart from eggs, milk, butter, and dairy products should not be stored in the refrigerator door.
Uncover the Hidden Secrets to Cooking Eggs that Every Woman Should Know

Simple tips and tricks can make all the difference in the kitchen, but if you’re not aware of them, your cooking journey can quickly turn into a nightmare.


