There are currently many screen capture and screen recording software options available for users to choose from. Some popular software includes ScreenHunter Pro, Snagit, and HyperSnap. However, one interesting software that should not be overlooked is Faststone Capture.
Although not as well-known as the aforementioned utilities, FastStone Capture deserves your attention. Faststone Capture offers a variety of options for capturing screens, recording videos, and integrated editing tools, allowing you to add a personal touch to your images before sharing them with others.
What is Faststone Capture?
FastStone Capture is screen capture and screen recording software for Windows. The software allows users to capture the entire screen, specific windows, or a portion of the screen. It also includes the ability to record screen activities as videos.
FastStone Capture provides various editing and annotation tools to modify captured images and videos. It can be considered a useful software for creating and sharing screen content with others in a simple and interesting way.
After capturing an image, users can save it to the clipboard, print it directly, convert it to a PDF file, send it via email, insert it directly into Office application documents (OneNote, Word, Excel, PowerPoint), or upload it to your website. Additionally, FastStone Capture supports recording all screen changes, from mouse movements to voice recordings through microphones, and the final result can be saved as a compressed video file.
Key Features of Faststone Capture
- Screen Capture: Allows users to capture the entire screen, specific windows, or a specific part of the screen.
- Screen Recording: Provides the ability to record screen activities as videos.
- Supports Various Formats: Supports various image and video formats for users to store and share images and videos as desired.
- Cross-platform Sharing: Captured screen images or videos can be sent via email, directly shared to OneNote, Word, Excel, and PowerPoint documents, or sent to a web server (FTP).
- Annotating and Editing: Provides various editing, annotation, and modification tools for captured images and videos.
- Customizable Hotkeys: Allows users to customize hotkeys for easy operation and speeding up the capture and recording processes.
- Audio Recording: Includes an audio recording feature to support tutorial video creation or simple audio recording from the computer.
The aforementioned features are just some of the key features of FastStone Capture, and there may be many other features depending on the specific version of the software.
How to Download Faststone Capture
Before diving into the details of how to use Faststone Capture, let’s first explore how to download Faststone Capture to your computer and install the software.
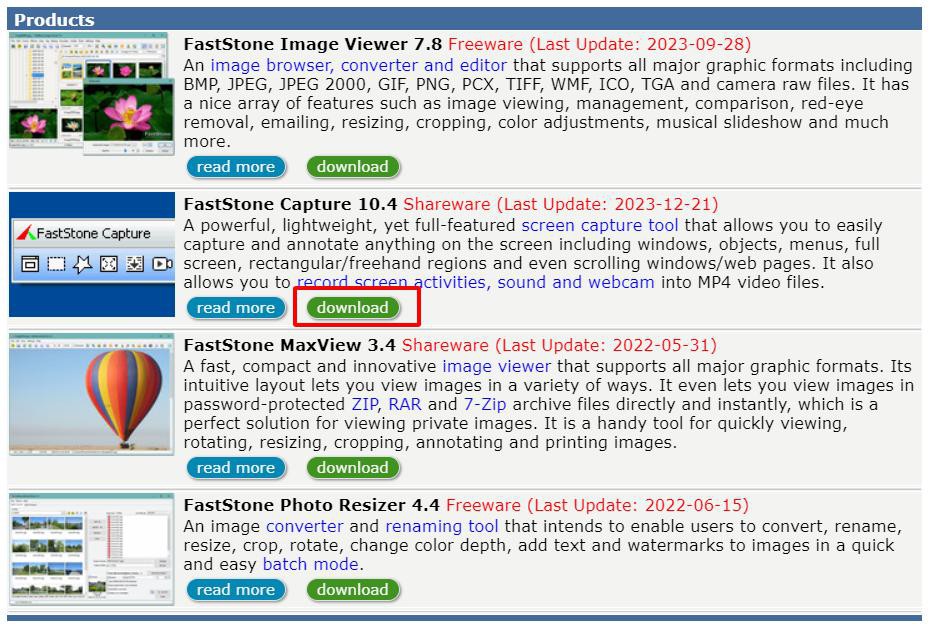
Step 1: Open your favorite web browser on your computer and go to the Faststone.org website.
Step 2: Scroll down to find the FastStone Capture software and click on the blue download button.
Step 3: On the next page, you will see three options to download Faststone Capture to your computer. Simply click on the corresponding download button below to download in the following formats:
- Exe: Download Faststone Capture as an executable file with a single file. This is the most commonly chosen option.
- Zip: Download Faststone Capture as a compressed Zip file format of the above Exe file. Some web browsers or internal networks restrict downloading Exe files. Therefore, if you are using such networks, choose to download Faststone Capture as a Zip file. After downloading, simply extract the file to find the Exe file (installer) of the software.
- Portable: Download Faststone Capture as a ZIP file, including all necessary files to run the application independently in any folder you want. The advantage of the portable file is that you can copy it to a memory card, USB flash drive, or copy or move it from one computer to another by simply copying the file to use it without installation.
Step 4: After clicking the download button corresponding to the desired method of downloading Faststone Capture, the software will automatically download to your computer for installation in Exe or Zip files, or directly use it without installation in the case of the Portable file.
Step 5: After the download process is complete, access the folder where the software was downloaded. Then, double-click on the file FSCaptureSetup104.exe (if you downloaded a Zip file, you need to extract it first). In the appeared warning dialog, click the Run > Yes button to continue.
Step 6: In the new installation dialog that appears, click the Next button to continue.
Step 7: Click the I Agree button to agree to the software’s terms and continue.
Step 8: Choose the installation folder for Faststone Capture on your computer. The default installation folder is C:\Program Files (x86)\FastStone Capture\. You can click the Browse… button to change it.
Step 9: After selecting the installation folder, click the Install button to proceed with the installation of Faststone Capture on your computer.
Step 10: Once the installation process is complete, a new FastStone Capture 10.4 – Trial Version window will appear. Click the Continue Trial button to continue using the trial version.
How to Use Faststone Capture
1. How to Use Faststone Capture to Capture Screenshots
Using Faststone Capture to take screenshots is relatively simple, as most screenshot features are integrated into the always-visible toolbar of Windows applications. Compared to other screenshot tools, Faststone Capture offers 7 different ways to capture screenshots, including (in order from left to right, from 1 to 7):
/fptshop.com.vn/uploads/images/tin-tuc/171389/Originals/faststone-capture-la-gi-cach-tai-faststone-capture%20(7)(1).jpg)
- Capture Active Windows: Capture the entire screen of the active application window. The keyboard shortcut Alt + PrtSc can be used for this.
- Capture Windows: Capture a specific area of a working application window. The keyboard shortcut Shift + PrtSc can be used for this.
- Capture Rectangular Region: Capture a customizable area of the screen by dragging the mouse. The keyboard shortcut Ctrl + PrtSc can be used for this.
- Capture FreeHand Region: Capture an area of the screen by hand-drawing it with the mouse. The keyboard shortcut Ctrl + Shift + PrtSc can be used for this.
- Capture Full Screen: Capture the entire contents of the screen. Press the PrtSc key for this.
- Capture Scrolling Window: Capture a long content that requires scrolling. This feature is suitable for capturing multi-page websites, allowing you to capture the entire long content of that website easily through the scroll bar on the right. The keyboard shortcut Ctrl + Alt + PrtSc can be used for this.
- Capture Fixed-Size Region: This option allows you to capture an image within a fixed-size frame, which can be adjusted as needed. The keyboard shortcut Ctrl + Shift + Alt + PrtSc can be used for this.
Note: All of the above ways to capture screenshots using Faststone Capture, in addition to direct access from the always-visible toolbar, can also be accessed from the main interface of the software by clicking the Capture menu.
/fptshop.com.vn/uploads/images/tin-tuc/171389/Originals/faststone-capture-la-gi-cach-tai-faststone-capture-21.jpg)
2. How to Use Faststone Capture to Record Screen
Using Faststone Capture to record the screen is also relatively simple. You can follow the steps below:
/fptshop.com.vn/uploads/images/tin-tuc/171389/Originals/faststone-capture-la-gi-cach-tai-faststone-capture%20(7)(1).jpg)
Step 1: Open FastStone Capture and click on the screen recording icon (Screen Recorder – 8) on the floating toolbar.
Step 2: A new Screen Recorder window will appear, allowing you to select the screen area to record, including:
/fptshop.com.vn/uploads/images/tin-tuc/171389/Originals/faststone-capture-la-gi-cach-tai-faststone-capture%20(9).jpeg)
- Window/Object: Option to record the screen with a selected window or object.
- Rectangular Region: Option to record the screen with a selected rectangular area.
- Fixed-Size Region: Option to record the screen with a selected area of fixed size.
- Full Screen Without Task Bar: Record the full screen without the system’s taskbar.
- Full Screen: Record the entire screen.
- Repeat Last Region: Repeat the previously selected recording option.
Step 3: After selecting the desired screen area to record, before clicking the Record button to start screen recording, you need to perform other optional settings according to your needs by clicking the Options button, such as Video (framerate and video quality options), Audio (audio source selection, audio quality), Output (choose where the video will be saved when exporting), etc.
/fptshop.com.vn/uploads/images/tin-tuc/171389/Originals/faststone-capture-la-gi-cach-tai-faststone-capture%20(8).jpeg)
Step 4: After making changes to the settings according to your needs, click the OK button to return to the Screen Recorder window. Then, click the Record button.
Step 5: A new window will appear, displaying all the settings you made in Step 3. If there are no changes, click the Start button to begin screen recording.
/fptshop.com.vn/uploads/images/tin-tuc/171389/Originals/faststone-capture-la-gi-cach-tai-faststone-capture%20(10).jpg)
Step 6: During the screen recording process, you will see the floating Screen Recorder toolbar, which is always visible on other application windows. Click the Resume button after ending the recording process, click the Save button to save the video, or click the Discard button to cancel the recording without saving.
3. How to Use Faststone Capture to Edit Images
In addition to capturing screenshots and recording videos, Faststone Capture can also be used to edit images. Let’s explore how to use Faststone Capture to perform basic image editing.
/fptshop.com.vn/uploads/images/tin-tuc/171389/Originals/faststone-capture-la-gi-cach-tai-faststone-capture%20(2).jpeg)
- Open: Option to open the image for editing.
- Save: Save the image after capturing or editing.
- Pan / Scroll: Click this button to select the way to select the desired image area.
- Zoom In: Enlarge the image.
- Zoom Out: Reduce the image size.
- 100%: Restore the image to its original size.
- Draw: Use this option if you want to choose tools to mark, insert text, add annotations to image details, fill color, insert images, blur any image area, add arrows, etc. All of these tools are located in the left sidebar.
/fptshop.com.vn/uploads/images/tin-tuc/171389/Originals/faststone-capture-la-gi-cach-tai-faststone-capture-22.jpg)
- Caption: This feature allows users to insert text or captions on the image. Simply enter the desired text to be inserted into the image in the empty Enter caption for this image box, click the Options button to choose the color of the text, the position of the text on the image, and add additional options such as inserting the time, date, account name, etc. Finally, click the Add button to insert the text into the image.
/fptshop.com.vn/uploads/images/tin-tuc/171389/Originals/faststone-capture-la-gi-cach-tai-faststone-capture%20(6).jpeg)
- Edge: Select one of the 4 options to insert a border frame around the image, in which each option allows you to change the border color, border thickness, etc. Note that there is an option to insert a copyright watermark into the image.
- Resize: As the name suggests, this feature allows you to resize the image according to your needs.
/fptshop.com.vn/uploads/images/tin-tuc/171389/Originals/faststone-capture-la-gi-cach-tai-faststone-capture%20(4).jpeg)
- Spotlight: Use this option if you want to highlight important content in the image.
- Blur: Option to blur a specific area of the image. To blur a specific area of the image, select the area and then click the Blur button. From the drop-down menu, choose the blur level (25%, 50%, 75%, or 100%).
- Crop: Cut out a selected area of the image.
- Cut: Remove the selected area of the image.
- Email: Function to send the edited or newly captured image by email. By default, Microsoft Outlook mail service is used.
- PDF: Convert the image to a PDF format.
/fptshop.com.vn/uploads/images/tin-tuc/171389/Originals/faststone-capture-la-gi-cach-tai-faststone-capture%20(7).jpg)
- Combine: This is an interesting feature that allows users to combine multiple images into one image. You can drag and drop to change the order of the arranged files, add shadow effects, change the size, etc.
- OneNote: Send edited or newly captured images directly to Microsoft applications including OneNote, Word, Excel, PowerPoint, or upload them to the web.
Note: Similarly to how Faststone Capture is used for image editing, it can also be used to edit videos. Users can resize videos, insert custom text, zoom in or out, crop videos, mark areas, and extract images from videos.
Conclusion
In summary, you have learned what Faststone Capture is and its key features, as well as detailed instructions on how to download Faststone Capture, install it, how to use Faststone Capture to capture screenshots and record videos. We hope that this article has helped you understand how to use Faststone Capture for your work needs. Good luck!
What is LightShot? How to download LightShot to capture screens quickly
Download LightShot to your computer allows you to capture laptop and PC screens quickly. In addition, LightShot also has many other features such as photo editing, sharing images in link format, or using images to search on Google quickly. Let’s find out the steps to download LightShot to your computer.
The Ultimate Guide to Effortless Screen Recording on Windows 10 in 2024
 Recording on Windows 10 in 2024’>
FPT Shop guides you on how to screen record on Windows 10 easily and effectively. From capturing screenshots to recording videos and capturing audio, we’ll explore the powerful features of Capture, a built-in tool in the Windows 10 operating system.


