


The Christmas Grotto is the place that marks the birth of Jesus. Many families have a tradition of making a Christmas Grotto at home with simple materials such as cardboard, carton… with just a few ingredients and a few hours, you’ll have an impressive Grotto to decorate for Christmas.
1. Origin and meaning of the Christmas Grotto
According to the author Omer Englebert:
“St. Francis was on his way back to his hometown from Rome when he met a teacher named Jean Velita.”
He then said to him: “I wish to celebrate Christmas to honor the birth of Jesus in Bethlehem. But to show the suffering and hardship of Jesus from an early age, I ask you to make a Grotto resembling the true one with dry grass and lead a donkey and an ox to imitate the ones that accompanied Jesus in the past.” Jean Velita obeyed and made a Grotto just as Francis instructed.
 Origin and meaning of the Christmas Grotto
After announcing the good news, St. Francis shared the word of God to those who came to listen. He told about the story of a poor emperor born in Bethlehem who was often referred to as Jesus. After finishing the story, Francis imitated the voice of a sheep and a donkey calling Bethlehem, and suddenly people saw the baby Jesus waking up from sleep and smiling.
From that time, the first Christmas Grotto was born in Greccio. At first, the Grotto was only built in churches, but later many wealthy and prestigious people made Grottoes at home. Nowadays, the Christmas Grotto is an indispensable part of the Christmas season. Because the Christmas Grotto carries a beautiful meaning of the birth of Jesus.
2. Simple ways to make a Christmas Grotto at home
A Christmas Grotto can be made easily at home with materials such as silver paper, cardboard, carton, cement bags, or even ice cream sticks…
How to make a Grotto with silver paper
Prepare the materials:
- Silver paper, brown cement paper (the quantity depends on the width of the Grotto)
- A small roll of zinc
- Hard cutting tool
- Glue or adhesive
- Long and short wooden pieces for the Grotto frame (4 long wooden pieces with equal length for pillars, different short wooden pieces)
- Decorative materials such as fake snow, small branches, tinsel, colored lights, Christmas statues set.
 How to make a Grotto with silver paper
Procedure:
Placing the statues inside the Grotto,
Scatter grass made from cement paper, add small branches…,Hang tinsel and decorative lights inside and around the Christmas Grotto.Place a small fence near the entrance of the Grotto, and you’re done.
How to make a Grotto with cardboard
To have a beautiful Grotto made from cardboard, the maker needs to be careful and meticulous.
Prepare the materials:
- Cardboard (can choose large cardboard boxes like TV or refrigerator boxes)
- Newspaper, wrapping paper
- Glue gun and glue
- Scissors
- Black paint
- Decorative items such as statues, lights, foam, a few dry branches
 How to make a Grotto with cardboard
Procedure:
How to make a Grotto with carton
This method is suitable for those who have limited space and want to create a mini Grotto that fits their space.
Prepare materials and tools:
- Foam board
- Imitation stone wallpaper
- Cardboard boxes of various sizes
- Scissors
- Glue and glue gun
- Decorative items such as lights, tinsel, 2-3 dry branches, white paint, decorative statues
 How to make a Grotto with carton
Procedure:
How to make a Grotto with foam boxes
This method has the advantage of longer preservation compared to Grottoes made from paper or cardboard.
Prepare materials:
- Foam boxes
- Hardboard
- Newspaper
- Glue and scissors
- Stapler and size 3 staples
- Decorative items such as string lights, ornaments, star, gray, silver paint
 How to make a Grotto with foam boxes
Procedure:
How to make a Grotto with ice cream sticks
This method is suitable for those who have limited space and want to create a mini Grotto that fits their space.
Prepare materials and tools:
- Ice cream sticks
- Paper knife, scissors
- Adhesive glue
- Decorative items such as statues, ornaments, coloring paint and brush
 How to make a Grotto with ice cream sticks
Procedure:
3. The most beautiful designs and ideas for decorating the Christmas Grotto
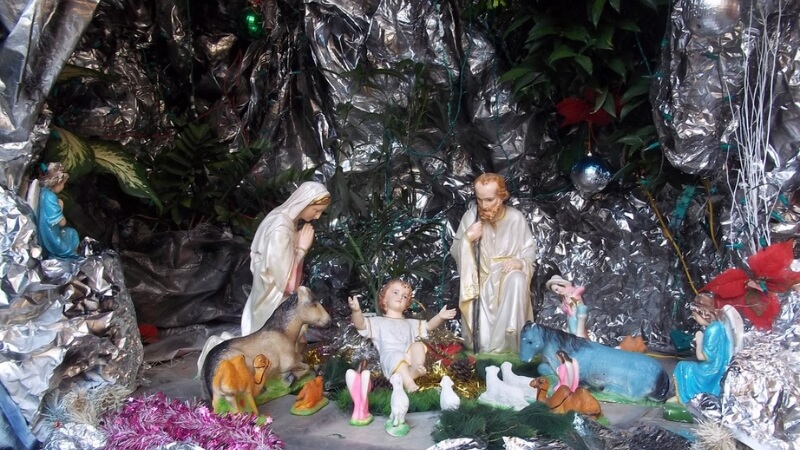
 Beautiful and grand Grotto made from silver paper
 Simple but beautiful Grotto made from silver paper
Beautiful and simple Grotto made from cardboard
 Beautiful and sparkling Grottoes made from foam boxes
 Grotto made from cement bags
 Beautiful and spectacular Grottoes made from ice cream sticks
Above are 5 ways to decorate a Christmas Grotto that can be easily made at home. With just a few easily available materials and a little time, you can create your own Grotto by hand. This not only shows gratitude to God but also creates a warm Christmas with family.
Silver Coins in Washing Machine Unexpectedly Revealed’>Outcome of Putting 3 Silver Coins in Washing Machine Unexpectedly Revealed

Most people know the basic steps of how to run a washing machine – load it up with clothes, pour in some detergent, hit start – but that may not be enough to ensure your laundry is optimally washed.
Is Cooking with Aluminum Foil in an Air Fryer Healthy?

Are you wondering about the safety of using aluminum foil in an air fryer? We will look into the matter and provide you with an answer.
“Build a Clothes Folding Machine with Easy-to-Follow Instructions”

Say goodbye to tedious chores like washing, drying, and folding your clothes! You can DIY a clothes folding machine from used materials in a few simple steps with the help of DienmayXANH.com. Check out these easy tips to craft your own machine that does the work for you!
DIY: Creating a Simple Thermos at Home

Are you looking for an easy way to make a thermos right in the comfort of your own home? Điện máy XANH has got you covered with five steps to help you create your own homemade thermos! Read on to find out how.
How to Easily Create Heart-shaped Boiled Eggs

Have you ever admired those beautiful heart-shaped half eggs in Bento lunch boxes and wondered how to achieve that perfect shape? Well, fret no more! Let me share with you the secret behind creating those stunning eggs.


