


Fruit carving is an art that can elevate any meal or gathering. While it may seem intimidating, with these simple techniques, anyone can create beautiful fruit displays.
1. Apple Carving Techniques
Apple Flower
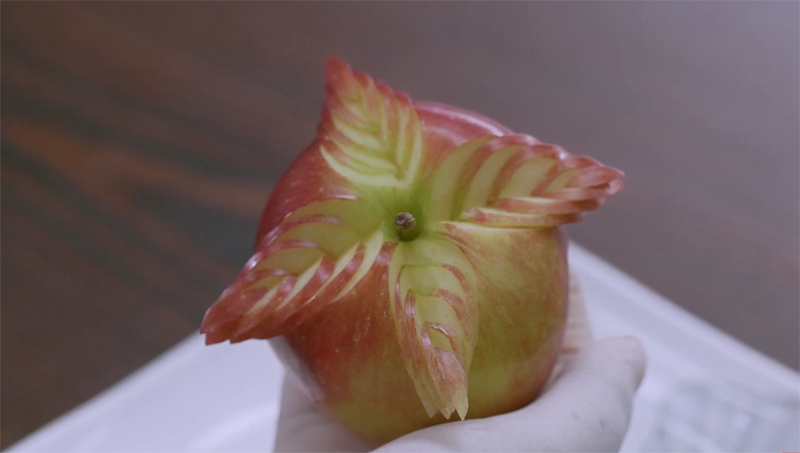 Apple Flower
Mark four evenly spaced points on the apple with a sharp knife. Choose one point and make a very small V-shaped cut. Set the small piece aside. Repeat this process, making slightly larger V-shaped cuts that overlap the previous cut. Finally, stack the apple slices back together as shown in the image.
Repeat this process on the three remaining sides of the apple.
Apple Spiral
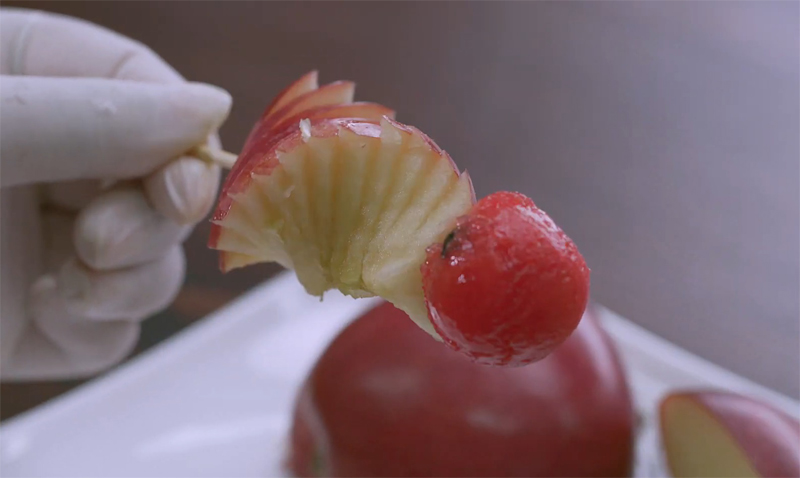 Apple Spiral
Cut the apple into four parts, and then slice each piece into thin slices. Use a skewer to secure the apple slices and then twist them into a spiral shape.
You can add a slice of watermelon on top for extra appeal.
There are also other apple carving techniques you can try.
Heart-Shaped Apple
First, cut the apple in half, and then carefully cut it into even layers. Finally, push the layers in one direction to form a heart shape.
 Heart-Shaped Apple
2. Orange Carving
 Cut and Peel the Orange
 Create a Stand for the Orange Segments
The beautifully carved orange segments are sure to impress. Give this technique a try and elevate your fruit presentation!
 Final Result
3. Mango Cutting Technique
 Mango Cutting Technique
Cut the mango lengthwise around the pit, and then use a sharp knife to cut the flesh into small squares. Finally, turn the mango slice over to separate the squares.
4. Pineapple Cutting Technique
Cut off both ends of the pineapple and then cut it into four parts. Place one piece on a cutting board and use a sharp knife to cut from the sides to remove the peel.
Next, cut a V-shape along one side of the pineapple core, and then repeat on the other side. Finally, cut the pineapple into bite-sized pieces and arrange them in a staggered pattern on the pineapple peel. Repeat this process for the remaining three pieces.
5. Watermelon Carving Techniques
Watermelon Squares
First, cut the watermelon in half. Leave one half intact, and cut the other half into two pieces again, removing the peel.
After peeling, turn the watermelon so that the pointed end is in the palm of your hand, and cut a V-shaped groove along the length of the watermelon. Cut the watermelon into thin slices to create heart-shaped pieces.
For the other half of the watermelon, use a sharp knife to create a groove around the middle, where the flesh meets the peel. Then, cut the peel into a zigzag pattern. Make several cuts on the surface of the watermelon to create square shapes.
Finally, use toothpicks to secure the heart-shaped watermelon pieces onto the other half of the watermelon.
Watermelon Peacock
 Cut in Half and Create the Bird’s Head
 Final Result
 Final Result
The watermelon peacock is a stunning creation that is sure to impress. Give it a try, and you’ll be amazed at the results!
 Final Result
6. Dragon Fruit Carving
 Cut in Half and Create the Bird’s Head
 Create a Boat Shape
The dragon fruit boat is a unique and eye-catching creation. Impress your guests with this beautiful presentation!
 Heart-Shaped Apple
These fruit carving techniques are simple yet stunning. Master these techniques and impress your family and guests with beautifully presented fruit platters!
Tips for Pruning and Decorating a Mid-Autumn Festival Fruit Tray for the August Full Moon Festival

A festive Mid-Autumn celebration is incomplete without the traditional tray of pruned fruits, featuring adorable animal creations for kids to enjoy on the night of the full moon.
Fruit Decorations: The Easiest and Most Stunning Designs That Will Leave Everyone in Awe

Have you ever tried decorating apples with oranges this way? It may look intricate, but the process is actually incredibly easy.


