A table of contents is a list of headings, page numbers, and the main content of a draft document. Creating a table of contents in Word is one of the intelligent features integrated into the Word text editor. This function not only saves time but also helps you keep track of the main points of the document quickly and scientifically. In the following article, Tintuconline will guide you on how to create a table of contents in Word 2007, 2010, 2013, and 2016 in a simple and easy-to-understand way. Read on to find out how.
How to create a table of contents in Word on a computer
Most versions of Word from 2007 to 2016 have the same steps to create an automatic table of contents, so you can follow the steps in this article! The process of creating an automatic table of contents involves two main steps: marking the contents and displaying the table of contents. Marking the contents is the most important step and it determines the accuracy of the table of contents. Therefore, you need to grasp the main content of the document to create an accurate table of contents.
1. Mark the content of the document to create a table of contents
You can mark the items in the table of contents automatically in one of two ways: using the built-in Heading Styles, or marking the individual text items.
Method 1: Use the built-in Heading Styles
Step 1: Select the content you want to format as a Heading, highlight it, and make sure not to include any extra spaces.
Step 2: Go to the Home tab
Step 3: In the Styles group, choose the Heading that best suits your needs.

If you can’t find the Style you want, click the arrow to open the Quick Styles Gallery. Alternatively, you can create a new Heading by choosing Save Selection as New Quick Style.
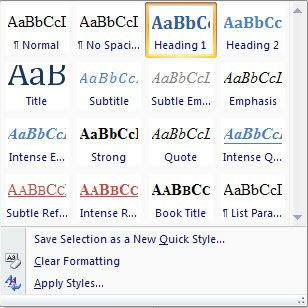
Method 2: Mark the items using Add Text in Table of Contents
Similar to Method 1, you need to select the content you want to create a Heading for by highlighting it, making sure not to include any extra spaces.
Step 1: Go to the References tab
Step 2: Choose Add Text in the Table of Contents group
Step 3: Choose the Level you want to apply to the selected content
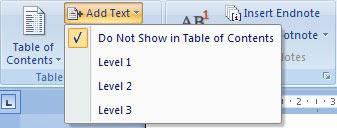
2. Proceed to create a table of contents in Word
To quickly create a table of contents, follow these steps: Place your cursor in the document where you want to insert the automatic table of contents (usually on the first or last page). Choose Table of Contents and select from the available table of contents templates. In Word 2016 and 2019, you have an additional option to customize the table of contents.
Note:
– More Table of Contents from Office.com: You will find more templates on the Microsoft Office website
– Remove Table of Contents: Removes the table of contents
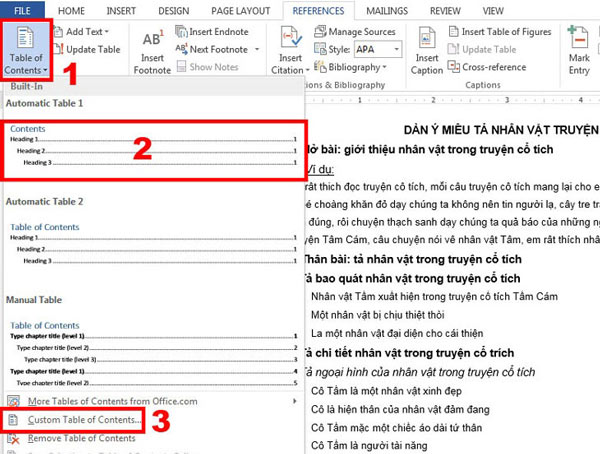
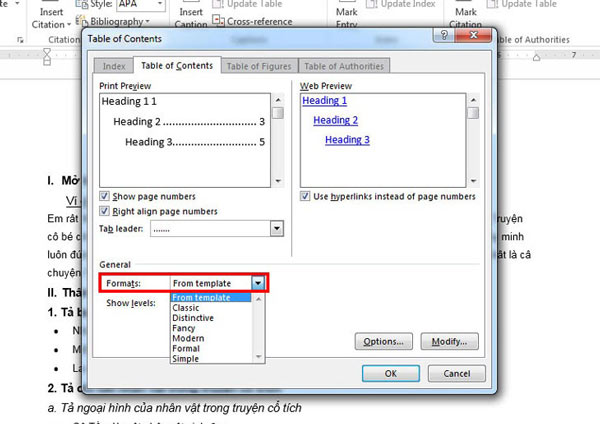
When choosing Custom Table of Contents, a dialog box will appear. This dialog box has two sections that you need to pay attention to:
Tab Leader: This determines the format when you press the Tab key. You have four options: None – do nothing, period; dash; underscore.
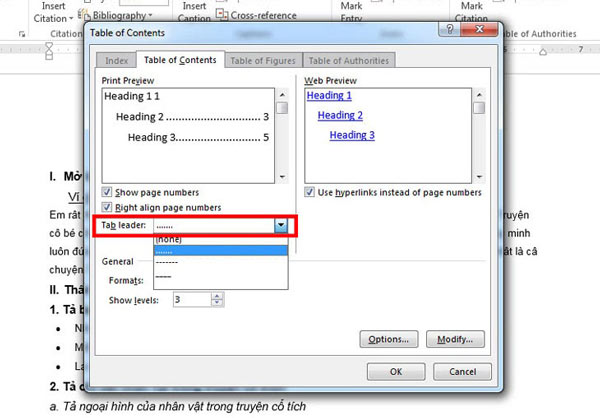
Format: This determines the format of the table of contents. You can choose from a variety of templates, each with its own unique layout.
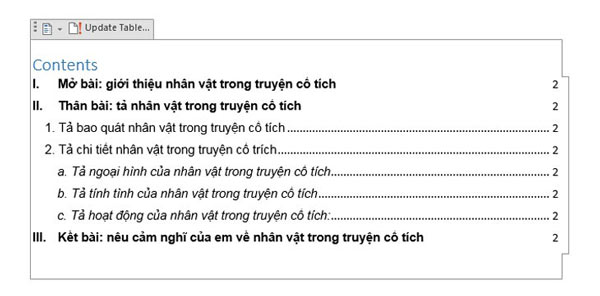
After making your selections, you will get a table of contents with headings and corresponding page numbers.
3. Update the Table of Contents
After editing the document to meet your requirements, if you want to delete or update the Headings, you can do so as follows. Go to the References tab in the Ribbon group. Click Update Table and choose the update option that suits your document. A dialog box will appear, offering you different editing options.
– Update page number only: Only updates the page numbers
– Update entire table: Updates both the headings and page numbers.
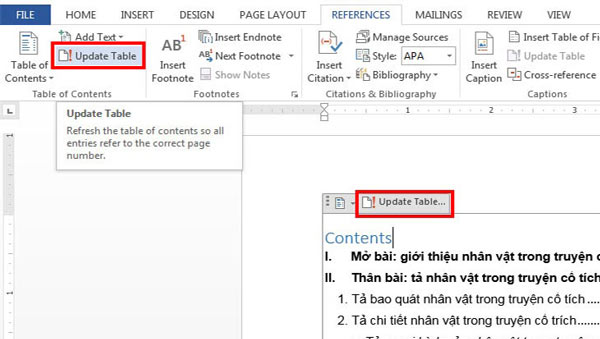
To delete the automatic table of contents, simply go to the References tab in the Ribbon group, choose Table of Contents, and then select Remove Table of Contents.
By An Nhien – Vietnamnet
How to Create a Detailed, Simple, and Fast Table of Contents in Google Docs
Creating a table of contents in Google Docs can make the overall structure more visually appealing, as you can preview and visualize the content within the Google Docs page. In the following guide, FPT Shop will provide you with detailed instructions on how to quickly and easily create a table of contents.


