


Want to install a water filter at home but don’t know how? Get informed with this guide.
2. Step-by-step Guide to Installing a Water Filter Correctly
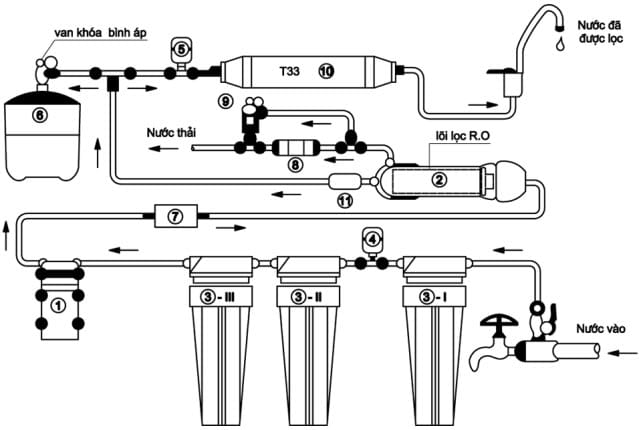
Step 1: Disconnect the water supply under the sink or at the water connection point and turn off the water.
Step 2: Unwrap filters 1, 2, and 3 and place them in their respective filter housings. Then, firmly tighten filter housings 2 and 3, but leave housing 1 slightly loose to avoid air buildup.
Step 3: Connect the RO pipe to the inlet of filter housing 1. Make sure the connectors are wrapped with thread seal tape and tightened securely to optimize the connection between the RO pipe and the connector.
Step 4: At the outlet of filter housing 3, disconnect the RO pipe and connect it directly to the drain. This step prepares for flushing filters 1, 2, and 3.
Step 5: Plug the RO system into a power outlet and open the water valve to start flushing and removing preservatives from filters 1, 2, and 3. This process takes about 20 minutes.
Step 6: If water overflows from filter housing 1 during flushing, tighten it further. Avoid overtightening; leave 1-2 threads loose. Overtightening can lead to air buildup and prevent the system from filtering water.
Step 7: After flushing filters 1, 2, and 3 for about 20 minutes, unplug the system and reconnect the RO pipe from the RO membrane inlet to the inlet of filter housing 3 (as it was initially)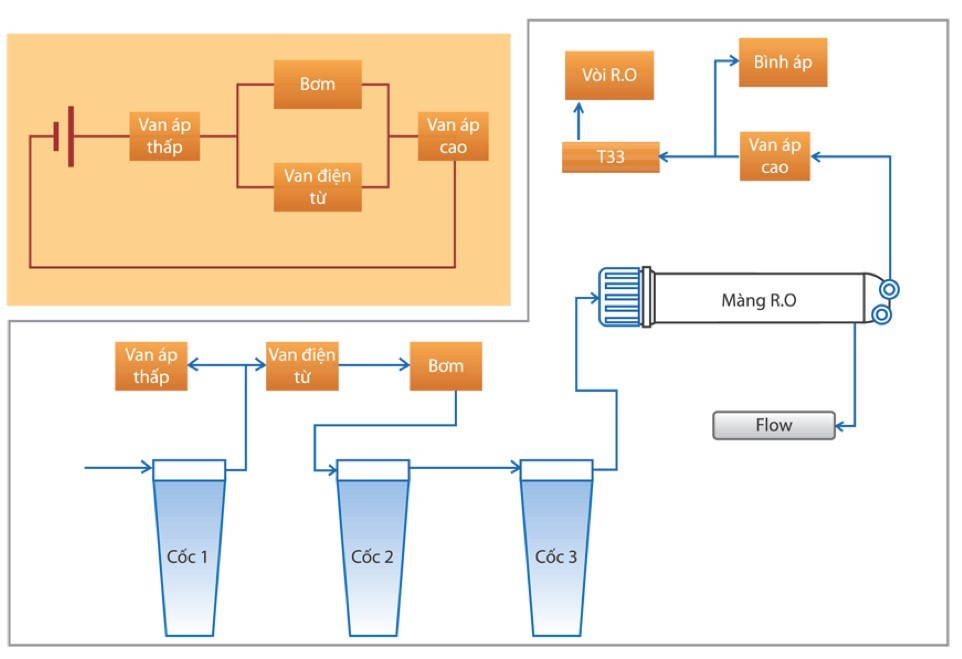
Step 8: Wear gloves and remove the plastic bag from the RO membrane. Steps 8, 9, and 10 should be done with gloves to maintain hygiene and prevent contamination of the membrane.
Step 9: Soak the RO membrane in pure water (bottled distilled water is recommended) so that the water penetrates the membrane’s structure and helps it expand, ensuring maximum filtration efficiency.
Step 10: Insert and firmly press the RO membrane into the membrane housing, with the black gasket side facing inward.
Step 11: Close and tighten the RO membrane housing cap. Use pliers to ensure a tight seal and prevent leakage.
Step 12: Connect the small RO pipe from the Flow valve to the household drain.
Step 13: Flush the RO membrane. At the outlet of the RO membrane (the blue pipe connection), remove the blue pipe and connect a small RO pipe (the external one) to the household drain.
Step 14: Plug in the system to start flushing the preservatives for about 20 minutes.
Step 15: After flushing the RO membrane, reconnect the pipes to the RO membrane housing as they were initially set up. Connect the purified water outlet pipe to the pressure tank.
Step 16: From the pressure tank, connect to the inlet of filter 5. Filters 5 and 6 are already connected.
3. Notes on Installing and Using an RO Water Filter
| Input water source | Input water quality meets QCVN 02:2009/BYT standards. |
| The water supply for the RO system must have a temperature between 5-50°C. Water temperature outside this range can damage the system. | |
| RO system installation location | Choose an installation location with convenient access to water and drainage. |
| To ensure proper system operation, the water column height to the RO system should be greater than 2m. | |
| Place the water filter on a flat surface in a vertical position. | |
| Bypass the low-pressure valve | If the input water pressure is too low, the RO system will not operate. In this case, bypass the low-pressure valve by pressing the switch to activate the RO filter system. |
| Maintain a constant water supply to the system when bypassing the low-pressure valve. | |
| Usage and maintenance | The main components of the RO system are made of plastic. Handle with care during use and avoid placing heavy objects on the system or exposing it to fire. |
| Check regularly to ensure the system is intact for safe use. | |
| Flush the RO membrane | Open the RO manual flush valve daily to flush the RO membrane. This helps remove dirt and impurities, increasing the membrane’s lifespan, and improving the quality of purified water. |
| Flush the RO manual valve for about 1 minute. | |
| First-time use of the RO system | Discard the first 1-2 tanks of water in the pressure tank when using the RO system for the first time. |
| When the RO system starts operating, the ppm (TDS) in the purified water will be slightly higher, but it will stabilize after some time. | |
| When using the RO system for the first time or after a power failure, collect water or discard the first few liters of purified water to ensure the tank is full. | |
| Do not disassemble or modify the installation diagram | The RO system installation diagram is optimized by the manufacturer. Any changes, however minor, can affect the system’s operation and compromise water quality. |
| Note for NEO AMBIENT – HOT models |
|
- Turn off the water supply and disconnect it from under the sink or at the connection point.
- Unwrap and place filters 1, 2, and 3 into their respective housings. Tighten housings 2 and 3 firmly, but leave housing 1 slightly loose to prevent air buildup.
- Connect the RO pipe to the inlet of filter housing 1, ensuring the connectors are wrapped with thread seal tape for a secure fit.
- Disconnect the RO pipe from the outlet of filter housing 3 and connect it directly to the drain. This step prepares for flushing the first three filters.
- Plug in the RO system and open the water valve to begin flushing filters 1, 2, and 3, removing preservatives. This process takes approximately 20 minutes.
- If water overflows from filter housing 1, tighten it further, but avoid overtightening. Leave 1-2 threads loose to prevent air buildup and ensure proper filtration.
- After flushing the first three filters, unplug the system and reconnect the RO pipe from the RO membrane inlet to the inlet of filter housing 3.
- Don gloves and remove the plastic bag from the RO membrane. This step and the next two are crucial for maintaining hygiene and preventing contamination.
- Soak the RO membrane in pure water (preferably bottled distilled water) to allow the water to penetrate the membrane’s structure, ensuring maximum filtration efficiency.
- Insert and firmly press the RO membrane into the membrane housing, ensuring the black gasket side faces inward.
- Close and tighten the RO membrane housing cap with pliers to prevent leakage.
- Connect the small RO pipe from the Flow valve to the household drain.
- Flush the RO membrane by removing the blue pipe from the outlet and connecting a small RO pipe to the household drain.
- Plug in the system and flush preservatives from the RO membrane for about 20 minutes.
- Reconnect the pipes to the RO membrane housing and the purified water outlet pipe to the pressure tank.
- From the pressure tank, connect to the inlet of filter 5. Filters 5 and 6 are now ready for use.
- Input water source: Ensure the water quality meets QCVN 02:2009/BYT standards. The water temperature for the RO system should be between 5-50°C to avoid damage.
- Installation location: Choose a location with easy access to water and drainage. The water column height to the RO system should be greater than 2m for proper operation. Place the water filter vertically on a flat surface.
- Bypass the low-pressure valve: If the input water pressure is low, bypass the low-pressure valve by activating the switch. Maintain a constant water supply when doing so.
- Usage and maintenance: Handle the RO system with care, as it is made of plastic. Avoid placing heavy objects on it or exposing it to fire. Regularly check for any damage to ensure safe use.
- Flush the RO membrane: Open the manual flush valve daily to remove dirt and impurities, prolonging the membrane’s lifespan and improving water quality.
- First-time use: Discard the first 1-2 tanks of water in the pressure tank. Initially, the ppm (TDS) in purified water may be higher but will stabilize. When using the system for the first time or after a power outage, collect or discard the first few liters of purified water to fill the tank.
- Installation diagram: Do not disassemble or modify the manufacturer’s optimized installation diagram, as any changes can affect the system’s performance and water quality.
- Note for NEO AMBIENT – HOT models: Ground the water filter during use. These models have high power consumption, so use a dedicated outlet. Keep them out of children’s reach to prevent burns, and place containers close to the faucet to avoid hot water splashes.
Is Your Drinking Water Safe and Clean?

Do you know what is in the drinking water you consume daily? In this investigative report, we take a deeper look into the water sources to determine its safety for drinking.
How Often Should Water Filters be Replaced?

Everyone knows that water filters need to be replaced regularly to ensure the quality of drinking water, but many people don’t know how often they should replace a water filter.
8 Critical Details to Consider When Deciding to Buy a House

Buying a home is a lifelong investment. Please refer to the 8 important details below to ensure a beautiful living space without the need for additional repair costs.
Do I need to boil filtered water?

The principle of “eat ripe, drink boiled” raises many questions for people, whether it is necessary to boil filtered water or just drink it directly?
Installation guide for home water filter

Installing a water filter at home is an easy process that anyone can do. With just a few simple steps, you can enjoy clean and purified water right from your tap. First, gather all the necessary materials: a water filter system, a wrench, Teflon tape, and a bucket. Next, locate the main water supply valve in your home and shut it off. This will prevent water from flowing throughout the house during the installation process. Once the water supply is turned off, find a suitable location for the water filter system. It should be close to the main water supply and easily accessible for maintenance. Use a wrench to remove any existing fittings and connect the water filter system to the main water supply line. Secure the fittings with Teflon tape to ensure a watertight seal. Finally, turn the main water supply valve back on and check for any leaks. Run the water for a few minutes to flush out any air or impurities in the system. Congratulations, you have successfully installed a water filter at home!


