Facebook is the most popular social network in Vietnam, and a username is the most obvious identifying component of a user on this social network. However, there are still many cases in which we need to change our name on Facebook. For example, some people want to change their name to better suit their current personality, while others want to change the naive name they used in the past to appear more mature, …
/fptshop.com.vn/uploads/images/tin-tuc/179644/Originals/facebook-7.jpg)
In this article, FPT Shop will guide you on how to use Link 333 – a name that is probably also very familiar to the Facebook user community – to “change the name” of your account . These instructions are based on Meta’s adjustments made in March 2024 regarding changing names on Facebook. I hope you can change your account name through the following detailed instructions!
What is Link 333? Why use Link 333 to change a Facebook username?
Link 333 is an easy-to-remember way to refer to the last 3 digits of the URL https://www.facebook.com/help/contact/1417759018475333, also known as Change Name (facebook.com). This is a special link from the Facebook Help Center that allows you to change your account name quickly and easily.
In the past, Link 333 was the primary method by which a user could change their name on Facebook. Today, with improved updates to Meta’s user interface in general and the Meta Account Center in particular, this link has become a backup method in case you encounter problems changing your name using the new methods.
/fptshop.com.vn/uploads/images/tin-tuc/179644/Originals/facebook-5.jpg)
Normally, Facebook requires you to wait 60 days after your last name change to change your name again. However, with Link 333, you can bypass this waiting period and change your name immediately. In addition, having an easy-to-remember name and an easy-to-understand interface are also the main reasons why Link 333 is still a popular link used to change the names of many professionals in the Facebook service sector.
How to change your Facebook account name via Link 333 (Updated to Q3/2024)
Step 1: Log in to your Facebook account and access Link 333.
You can simply click on the link https://www.facebook.com/help/contact/1417759018475333 to access the Change Name section in Facebook’s Help Center. If you haven’t logged into your account before, this link will take you to the account login screen before you can change your name.
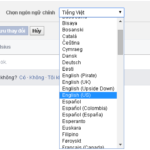
When you access Link 333, you can choose to change the language in the top right corner of the help section (if necessary).
/fptshop.com.vn/uploads/images/tin-tuc/179644/Originals/facebook-1.png)
Step 2: Enter the necessary information to change your name.
There will be 3 required pieces of information that you must enter, including the first and last name that you want to change to, and an email address that only you have access to so that Meta can contact you. You can also add a new middle name, however, this is not required.
Step 3: Upload an ID document (optional).
As the Facebook Help Center mentions, you can choose to upload a government-issued ID or other forms of identification that have your name on them, such as a library card, utility bill, etc… This is so that the Facebook Help Center can help you verify your name change information more accurately. In addition, they can also help if you lose access to your account or need to confirm your name on Facebook.
There are several different types of documents that you can choose to upload, including two main types:
- Government-issued identification (requires 1 document): Driver’s license, ID card, passport, birth certificate, …
- Non-government-issued identification (requires 2 documents): Student ID, library card, refugee card, employment certificate, diploma, loyalty card, …
These images of the documents must have your name and date of birth or your name and photo to help the Help Center ensure that only you have access to your account. These documents must be taken in good lighting conditions, clearly showing the necessary information, avoiding concealment by digital means to prevent the use of fake IDs and other abusive behavior.
/fptshop.com.vn/uploads/images/tin-tuc/179644/Originals/giay-to-tuy-than.jpg)
The copies of the documents that you submit will be encrypted by Meta and stored securely for up to 1 year to improve the automated detection of fake IDs. If you do not want these documents to be stored for the above purpose, you can deselect this option in the Identity Verification Settings section. The copy of that document will then be deleted within 30 days of submission or when you turn off this option.
You can click on this link to read more about the types of IDs accepted on Facebook, and this link to better understand what will happen to your ID after you submit it to Facebook.
Remember, you are not required to submit an ID document in order to submit your Facebook account name change request.
Step 4: Click Submit and wait for email confirmation.
After completing the steps to upload and enter your personal information, click the Submit button for Meta to collect your information and process your name change request.
/fptshop.com.vn/uploads/images/tin-tuc/179644/Originals/facebook-2.png)
If successful, Meta will send you a confirmation email to the email address you provided above.
What other ways can I change my Facebook account name?
In addition to using Link 333, you can also use newer links provided by Meta to change your Facebook name. This new link is https://accountscenter.facebook.com/profiles/100007470633050/name.
How To Change Your Facebook Name Within 60 Days
Facebook has recently updated their policy on account renaming, limiting users to changing their name no more than once every 60 days. If you’re wondering how to adjust your profile name within this timeframe, Dien May XANH will be providing a step-by-step guide to show you how. Keep reading to find out more!


