Troubleshooting Excel Display Issues: Solving the Mystery of Invisible Text
.jpg)
The mystery of invisible text in Excel is a common issue that can be frustrating for those who frequently work with data, such as accountants, HR professionals, and students. In some cases, you may find that your text is missing, displaying only symbols. Let’s unravel this puzzle and explore effective solutions to ensure your data is fully visible.
There are several reasons why your Excel spreadsheet might not be displaying all the text within a cell. Here are the main culprits:
- The column width is too narrow to accommodate the text.
- There is too much data in a single cell.
- Data in the cell to the left is causing an overlap.
- The “Wrap Text” feature is not enabled.
- The cell containing the data is not tall enough to display multiple lines.
Don’t worry; we’ve got you covered with quick and efficient fixes to resolve these issues!
Strategies to Fix Invisible Text in Excel
You can choose from several methods to adjust the cell size and reveal the hidden text. Let’s explore these techniques to make your Excel spreadsheet display content clearly:
Adjusting Column Width
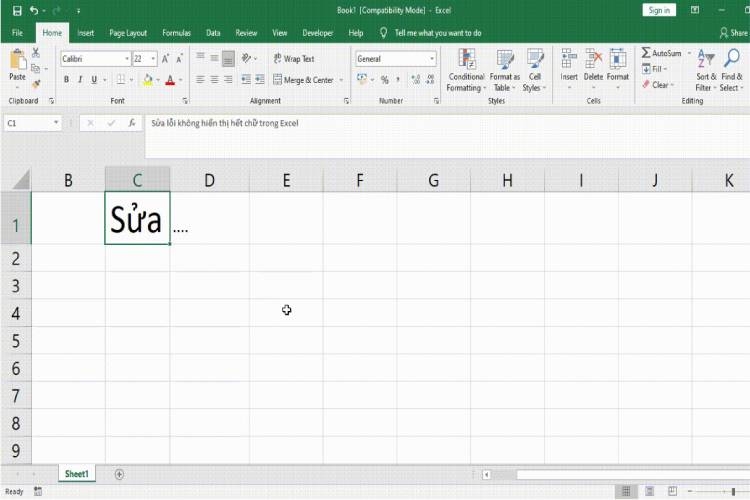
To automatically adjust the column width, follow these keyboard shortcuts: “Press Alt + H” > “Press O” > “Press I”. This will ensure that the column width adapts to the length of the text within it.
Breakdown of the Keyboard Shortcuts:
- Alt + H: This combination selects the Home tab in the menu bar.
- O: This key selects the Format option.
- I: This key automatically adjusts the column width to fit the content.
Step-by-Step Guide: Hold down the Alt key and then press H, O, and I in sequence.
Pros and Cons:
- Pros: This method is incredibly fast and automatically resizes the cells.
- Cons: The keyboard shortcut might be challenging to remember, and it offers limited customization options.
Adjusting Row Height
To automatically adjust the row height, use the following keyboard shortcuts: “Press Alt + H” > “Press O” > “Press A”. This will ensure that the row height adjusts to accommodate multiple lines of text.
Breakdown of the Keyboard Shortcuts:
- Alt + H: This combination selects the Home tab in the menu bar.
- O: This key opens the Format options.
- A: This key automatically adjusts the row height to fit the content.
Step-by-Step Guide: Hold down the Alt key and then press H, O, and A in sequence.
Manual Adjustment with Mouse
Using your mouse is a quick and straightforward approach to resizing cells. Here’s how you can adjust the column and row sizes to reveal hidden text:
- Adjusting Column Width: Move your mouse to the right edge of the column header until you see a double-headed arrow. Double-click to automatically resize the column, revealing all the data within.
- Adjusting Row Height: Position your mouse at the bottom edge of the row header until you see a double-headed arrow. Double-click to increase the row height, ensuring that all data is visible.
Pros and Cons:
- Pros: This method is fast, simple, and highly effective.
- Cons: It offers limited size options, and when you adjust rows, they may not align perfectly.
Utilizing the Autofit Feature on the Ribbon
The Autofit feature on the Ribbon provides a convenient way to resolve text display issues in Excel. Here’s a step-by-step guide:

Step 1: Move your cursor to the cell you want to adjust, and select the “Home” tab.
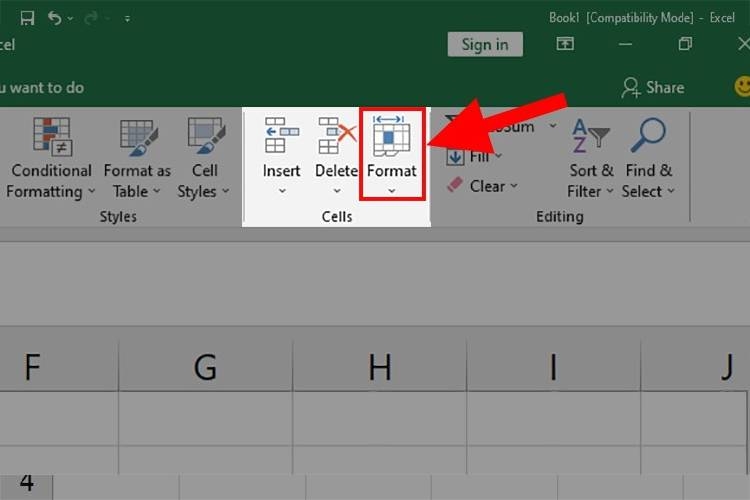
Step 2: Navigate to the “Cells” section and select “Format.”
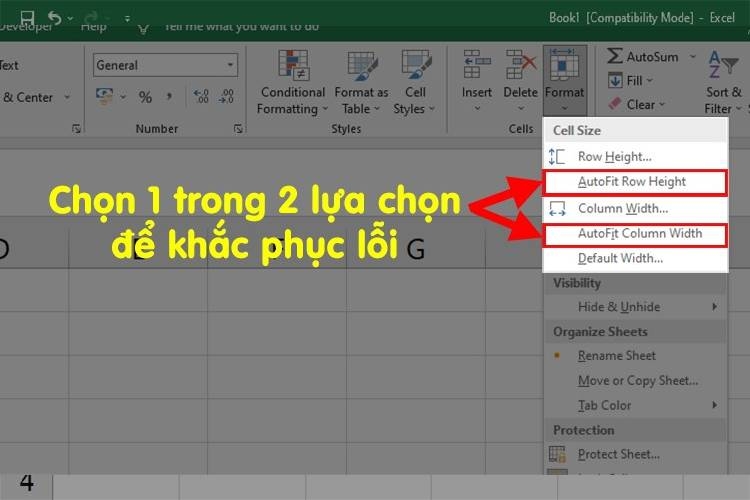
Step 3: Click on “AutoFit Row Height” or “AutoFit Column Width” to resolve the issue of invisible text.
Options Explained:
- AutoFit Row Height: This option automatically adjusts the row height to fit the content.
- AutoFit Column Width: This option automatically adjusts the column width to accommodate the text.
Pros and Cons:
- Pros: This method offers a variety of size options and makes it easy to align cells.
- Cons: It requires multiple steps and can be a bit intricate to execute.
Enabling Wrap Text in Excel
Wrap Text is a handy feature in Excel that allows text to automatically wrap within a cell. Here’s how you can enable it:

Step 1: Click on the cell where you want to enter data, and then select the “Home” tab.
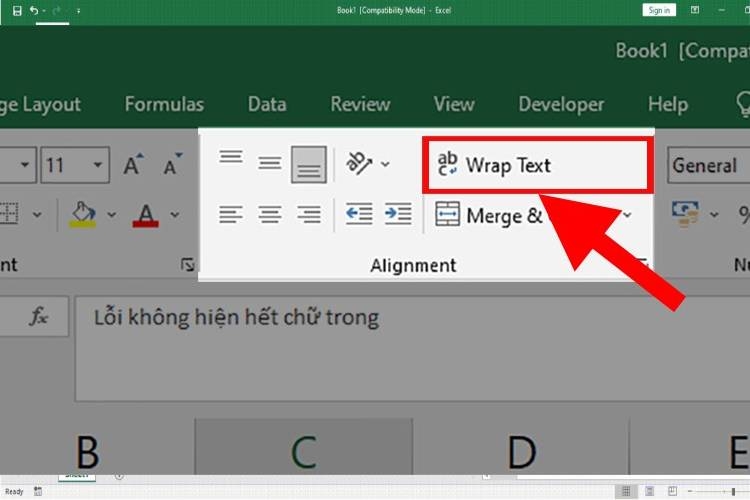
Step 2: In the “Alignment” section, click on “Wrap Text.”
Step 3: Start entering your data into the cell as usual. The text will now wrap within the cell, ensuring full visibility.
Pros and Cons:
- Pros: This method is quick and easy to execute, automatically wrapping text and adjusting cell size accordingly.
- Cons: Cell sizes cannot be uniformly adjusted once data has been entered.
Disabling Add-ins in Excel
While this approach may not directly address the issue of invisible text, it’s worth considering. In some cases, plugins or VBA code can interfere with cell sizing. Here’s how you can disable Add-ins in Excel:
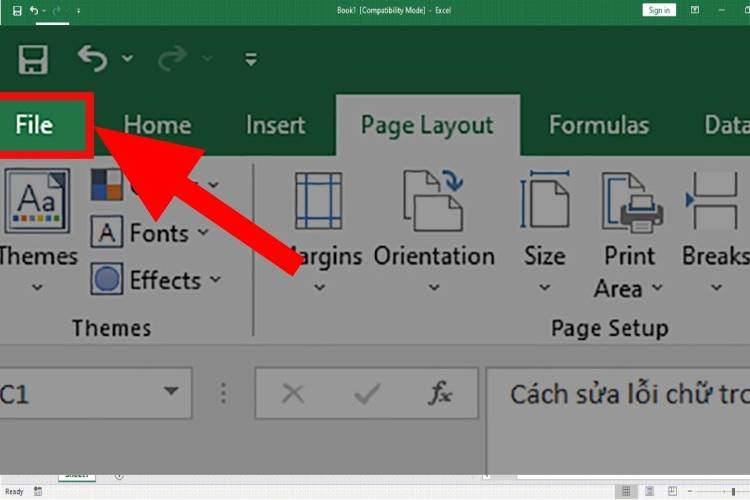
Step 1: Open your Excel file and click on the “File” tab.
Step 2: Select “Options.”
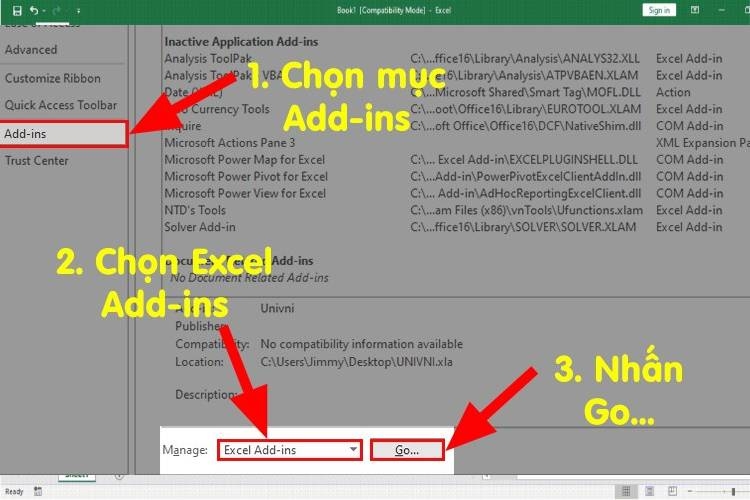
Step 3: Choose “Add-ins” and then select “Manage” and “Excel Add-ins.” Click on “Go.”
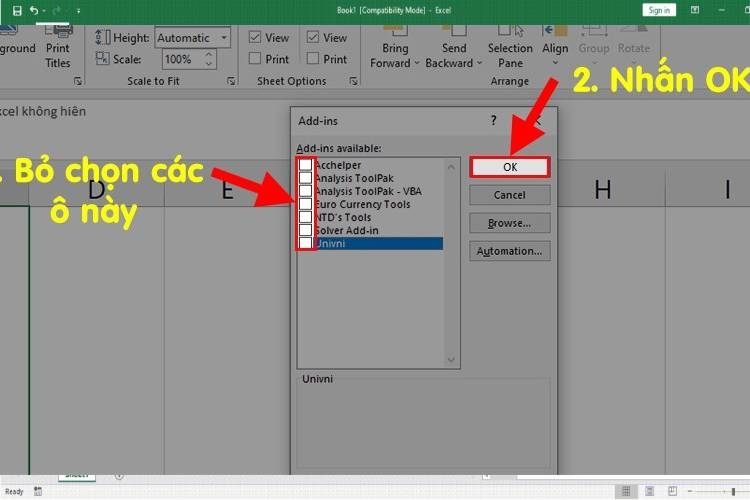
Step 4: Uncheck the boxes corresponding to the Add-ins you want to disable, and then click “OK.” If you need to enable Add-ins again, simply repeat the steps and check the boxes in Step 4.
Pros and Cons:
- Pros: It’s a simple and straightforward process.
- Cons: There may be cases where issues cannot be resolved, and it doesn’t directly address the invisible text problem.
Common Pitfalls When Fixing Invisible Text Issues in Excel
The Auto Fit Not Working Conundrum
Occasionally, you may encounter a situation where the Auto Fit feature seems to be malfunctioning. This issue can be frustrating, especially when extra spaces appear in your data, or when some spaces disappear upon printing, even though they’re visible in the preview. Let’s diagnose and resolve this problem:

- Cause: This issue can be attributed to the “Wrap Text” feature or copying data from another source.
- Solution: Follow the steps outlined below to tackle this problem effectively.
To fix the Auto Fit Not Working issue, perform the following steps:
- Step 1: Press “Ctrl + A” to select the entire table.
- Step 2: Drag the edge of any column header to adjust the width of all columns simultaneously.
- Step 3: Double-click on any row divider to automatically adjust the row height.
- Step 4: Double-click on any column divider to automatically adjust the column width.
Conclusion
In this guide, we’ve explored various scenarios of invisible text in Excel and provided simple yet effective solutions. We hope that these strategies will help you quickly resolve any text display issues you encounter in your Excel spreadsheets.
If you’re an Excel enthusiast or a professional who relies on its advanced functions, consider investing in a licensed copy of Microsoft Office. FPT Shop offers great deals on the latest and most comprehensive version of Microsoft Office. Check out the link below to explore this opportunity further:
- A Beginner’s Guide to Drawing Arrows in Excel
- How to Save Your Excel File on Different Devices: A Comprehensive Guide
What are Excel Add-ins? How to install them? Pros and cons when using Excel Add-ins
Excel add-ins are a well-known yet often overlooked feature of Excel that can greatly enhance your spreadsheet experience. But what exactly are Excel add-ins, and how can you leverage them to meet your specific needs? In this brief guide, we will explore the ins and outs of Excel add-ins, including their benefits and drawbacks. So let’s dive in and discover the power of Excel add-ins together!


