1 Four in Hand Knot
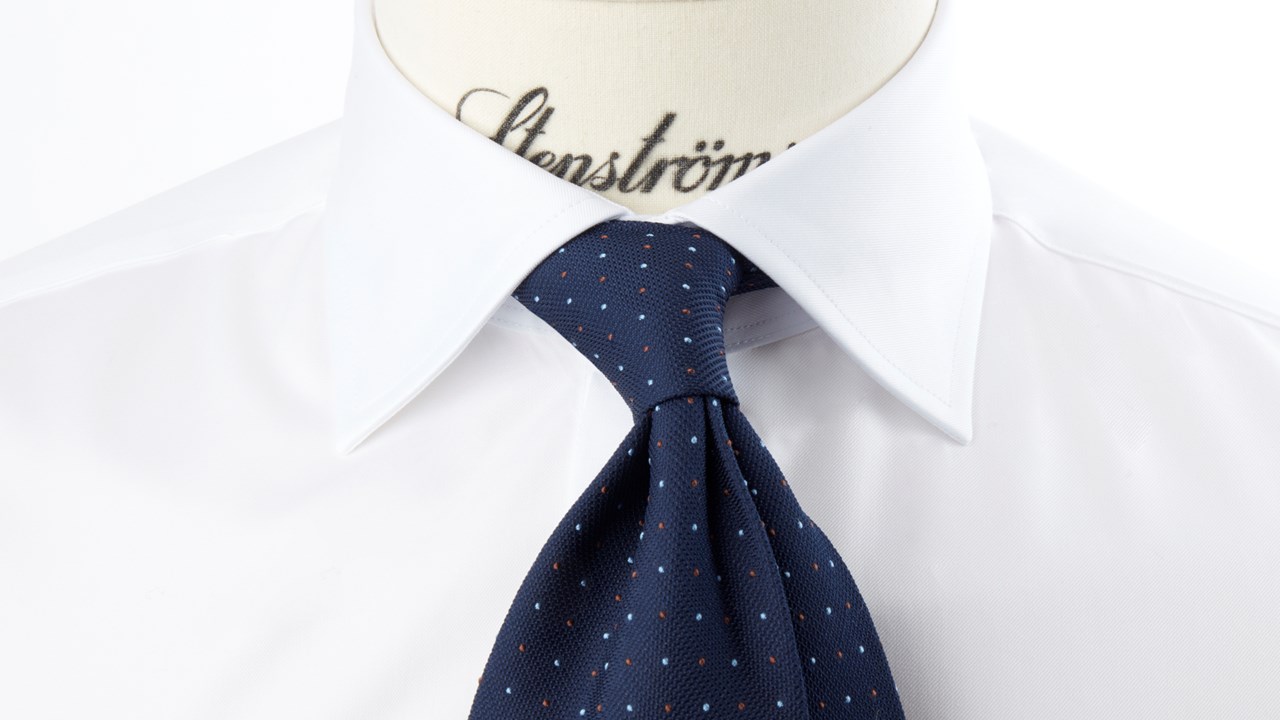
The Four in Hand Knot style is highly suitable for narrow collars. It can be confidently worn in various contexts and occasions, particularly parties and events with a youthful, modern direction. Due to its small knots and slightly asymmetrical shape, it is more appropriate for less formal occasions. Follow these 7 easy steps to tie a Four in Hand Knot.
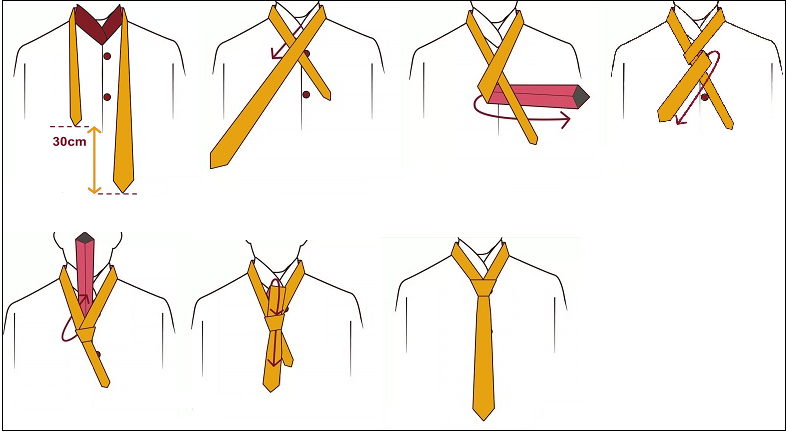
Steps:
Step 1: Open up your collar and place the wide side of the tie on the right side and the narrower side on the left side, about 30 cm higher.
Step 2: Hold the wide side of the tie over the left side of the narrow side near your neck.
Step 4: Loop the wide side upwards again, right where your left hand is holding the two ends of the tie.
Step 5: Use your right hand to hold the end of the wide side and pull up the back of the two ends at the neck.
Step 6: Bring the wide end down through the gap in the knot.
Step 7: Hold the top end of the narrow side and push the knot up close to the neck. Adjust the knot to make it even and tight, close the collar, and adjust the length of the tie accordingly. Ideally, the wide end that is close to your waist should be a good fit.
2 Pratt
The Pratt Knot is a versatile style suitable for all situations. It can be paired with your favorite shirt and has a triangular shape. This knot is slightly looser than the Windsor knot, making it easy to remove. It is ideal for casual outings with friends after work.
The Pratt knot is suitable for medium-thick ties, and the larger version works better than the smaller one. After tying, the knot will have a moderate width, larger than the Four-in-hand knot but smaller than the Half Windsor knot.

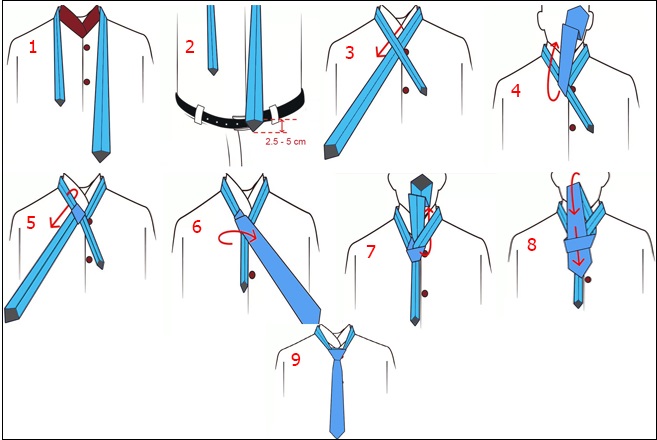
How to do it:
Step 1: Place the tie on the wrong side and wrap it around your collar. Leave the wide side of the tie on the right side and the narrow side on the left side.
Step 2: Adjust the position of the wide end so that its top just touches the lower eyelid of your belt buckle. You can adjust this within a range of 2.5 to 5 cm.
Step 3: Cross the wide end over the narrow end, moving the wide end diagonally to the left and under the narrow end.
Step 4: Move the wide end up and across the narrow end, positioning it near the collar.
Step 6: Fold the wide end from the left side to the right side, hiding the seam side at the back.
Step 7: Pull the wide end up and behind the knot’s intersection, right at your collar.
Step 8: Bring the end of the wide end down in front of the face through the gap in the knot.
Step 9: Slide the knot up to the center of the collar and pull the wide end down to tighten the knot.
3 Half Windsor
The Half Windsor style is suitable for important occasions. It is a variation of the traditional Windsor knot and is typically worn with wide-collared shirts.
What sets the Half Windsor knot apart from the traditional Windsor knot is its simplicity and compactness, making it suitable for all types of collars, ties, and fabrics.

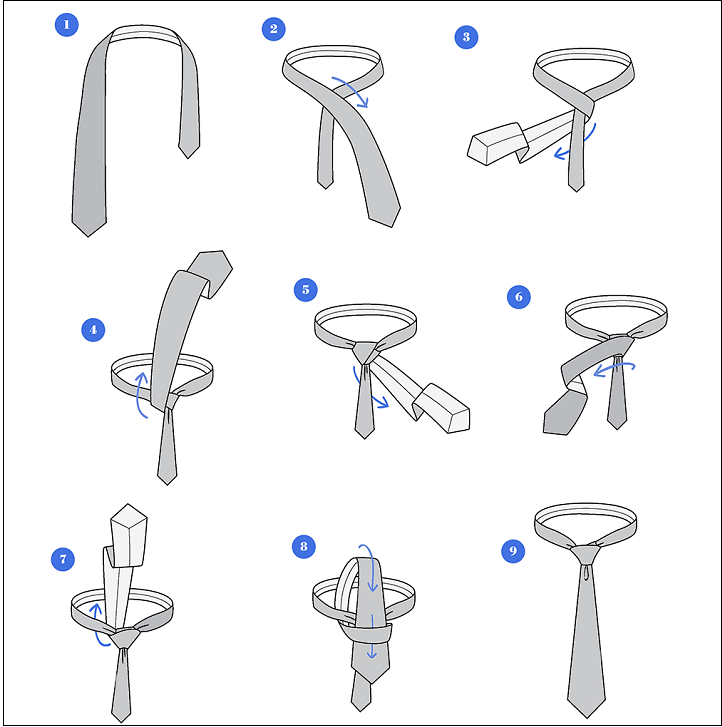
How to do it:
Step 1: Hold the tie in your hand, open your collar, and wrap it around your neck. The wide part of the tie should be on the right side and about 30 cm lower than the narrow left side.
Step 2: Hold the end of the wide tie over the left side, lying in front of the narrow end.
Step 3: Fold the wide side of the tie to the back of the narrow end, pulling it to the right as the top position. The seam side of the wide end will be visible at the front.
Step 4: Grab the wide end and pull it up to the top of your neck, securely holding it at the knot’s intersection.
Step 5: Thread the wide end inward and pull it down to the left side.
Step 6: Take the wide end and fold it over the front of the knot again.
Step 7: Pull the wide end to the back of the knot once more.
Step 8: Loosen the knot slightly and thread the wide end from top to bottom through the knot.
Step 9: Holding the narrow end with one hand, gently hold the knot and push it up to the top of the collar. Adjust the knot to tighten it and create a dimple in front of the knot.
4 Full Windsor
The Full Windsor is the ideal knot for formal occasions. It creates a thick, wide, and perfectly proportioned triangular knot. This style is best suited for wide-necked shirts and is often seen at weddings, speeches, and important meetings.
Tying the Full Windsor knot can be tricky as the knot should completely cover the top button of your shirt and be positioned exactly between the ends of your collar.

How to do it:
Step 1: Place the tie on the collar with the large end on the left side and the small end on the right side.
Step 2: Place the large end on top of the small end.
Step 3: Pull the large end back and thread it up through the neck slit.
Step 4: Pull the large end over the small end in the same direction as in step 2.
Step 5: Fold the large end behind the small end.
Step 6: Pull the large end upwards as shown.
Step 7: Thread the large end down through the neck slit again.
Step 8: Fold the large end over the small end.
Step 9: Pull the large end upwards through the slit as in step 3.
Step 10: Thread the large end through the knot.
Step 11: Adjust the knot.
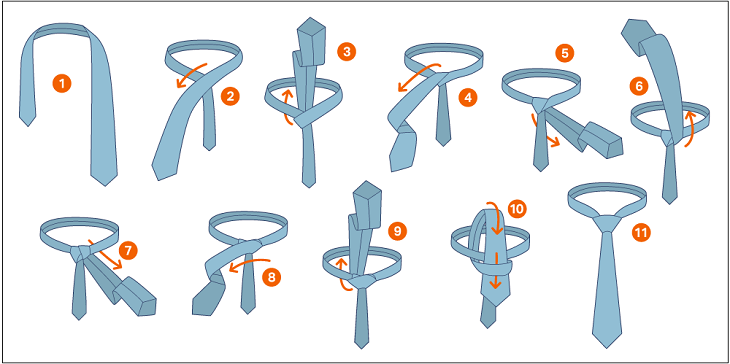
5 Balthus
The Balthus knot is one of the most challenging knots with 11 steps. It was favored by European aristocrats in the past, exuding elegance and freedom. This style is suitable for important events with a large number of people.

How to do it:
Step 1: Place the tie on the collar with the large end on the left side and the small end on the right side.
Step 2: Fold the small end behind the large end.
Step 3: Pull the small end up and thread it through the button.
Step 4: Wrap the large end to the front left.
Step 5: Pull the large end up and place it on the button as shown in picture 5.
Step 6: Wrap the large end to the front right.
Step 7: Pull the large end up and place it on the button as shown in figure 7.
Step 8: Wrap the large end to the front left.
Step 9: Pull the large end to the right and fold it over the small end.
Step 10: Put the large end through a few buttons as shown in figure 10.
Step 11: Tie the knot and adjust the tie.
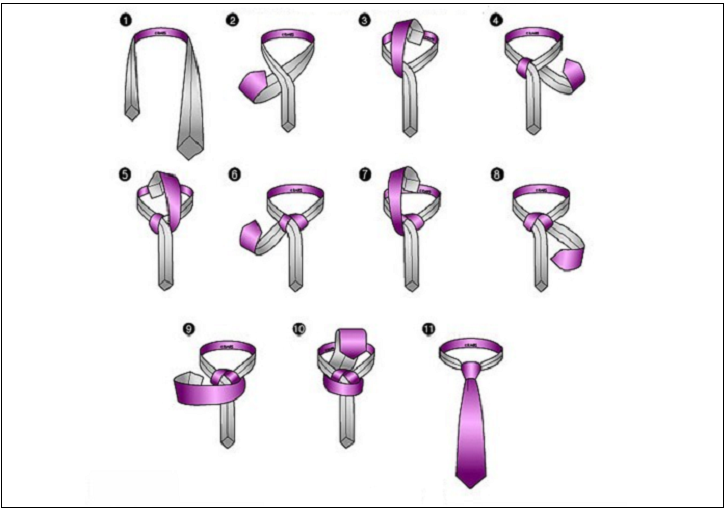
6 Cafés
As the name suggests, the Café knot was favored by frequent café customers in the early 20th century. This knot is sophisticated and attention-grabbing, making it more suitable for casual suits, sports jackets, or even short-sleeved T-shirts. It is not suitable for formal or office events.
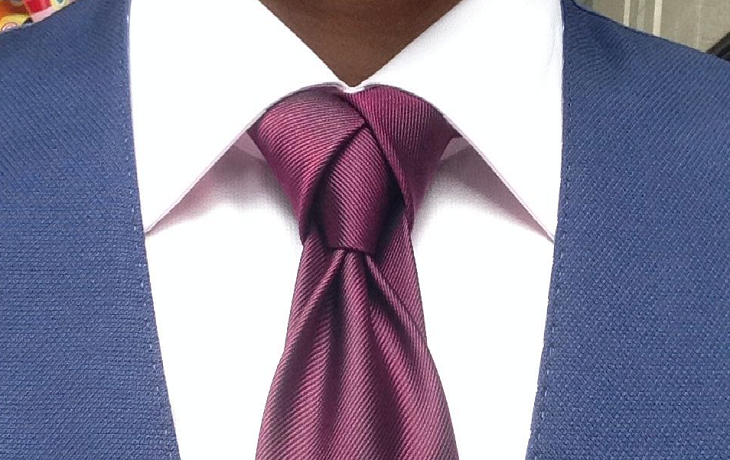
How to do it:
Step 1: Place the tie on the right side of the collar, with the large end on the right and the small end on the left.
Step 2: Fold the small end on top of the large end and loop it back through the button.
Step 3: Pull the small end forward and fold it behind the large end.
Step 4: Loop the small end up and over the button as shown in Figure 4.
Step 5: Pull the small end out and to the left.
Step 6: Loop the small end behind the big end.
Step 7: Pull the small end up and place it on the button.
Step 8: Put the small end into the small button on the back of the tie.
Step 9: Pull the small end down.
Step 10: Curl the large end.
Step 11: Tie the knot and adjust the tie.
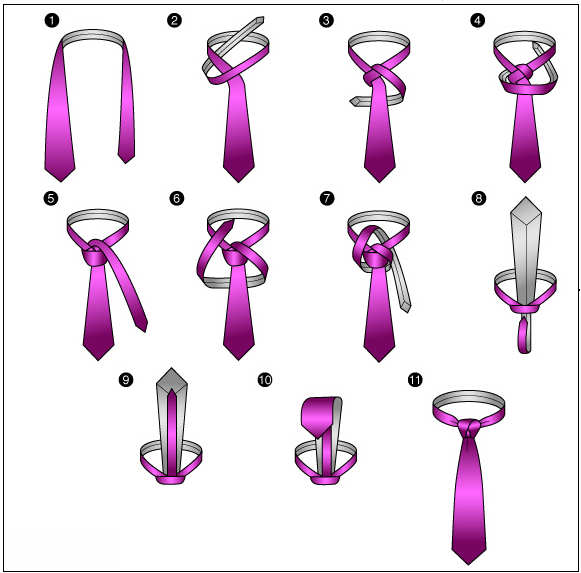
7 Trinity
Similar to the Eldredge style, the Trinity tie creates 3 symmetrical angles instead of a single straight angle like conventional knots, resulting in a unique shape.
The Trinity knot produces a fairly large knot when tied. It is best suited for everyday events rather than formal occasions.

How to do it:
Step 1: Place the tie on the right side of the collar, with the large end on the right and the small end on the left.
Step 2: Fold the small end over the large end and thread it through the button from the bottom.
Step 3: Pull the small end outward to the right.
Step 4: Fold the small end behind the thin end.
Step 5: Pull the small end upwards.
Step 6: Pull the small end over the button and bring it to the right.
Step 7: Fold the small end on top of the large end and thread it through the button from the bottom.
Step 8: Pull the small end out and put it in the button.
Step 9: Put the small end behind the big end.
Step 10: Pull the small end over the button as shown in Figure 10.
Step 11: Pull the small end to create a knot.
Step 12: Tie the knot and adjust the tie.

(*Reference source: cavat.com)


