Laptop cameras are essential for video conferencing, online learning, and social media interactions. When a laptop camera malfunctions, it can be frustrating and disruptive. To understand the causes of a faulty laptop camera and find effective solutions, read this guide from FPT Shop.
Causes of Laptop Camera Malfunctions
Laptop camera malfunctions can stem from various factors. One common cause is antivirus software installed on the device blocking the camera. Additionally, privacy restrictions or permission denials by certain applications can also lead to camera issues. Regardless of the cause, users should remain calm and follow the troubleshooting steps outlined below to resolve the problem promptly.
/fptshop.com.vn/uploads/images/tin-tuc/179629/Originals/camera-laptop-bi-loi-nguyen-nhan-do-dau-va-lam-cach-nao-de-khac-phuc-hieu-qua1.jpg)
How to Fix a Faulty Laptop Camera
If you encounter a sudden issue with your laptop’s camera, try these troubleshooting steps to resolve it.
Restart the Laptop
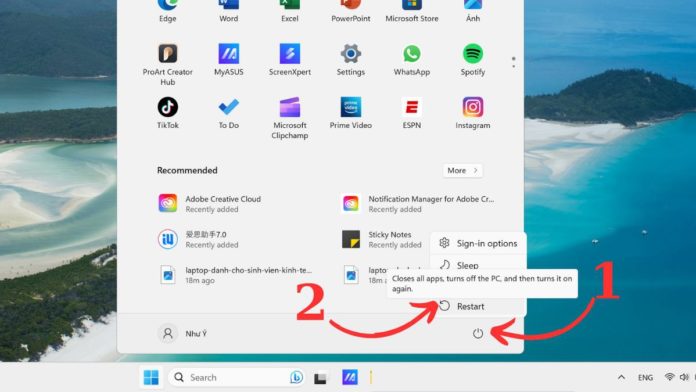
One of the simplest methods to fix a malfunctioning laptop camera is to restart the device. Restarting your laptop is effective for resolving camera issues in laptops running Windows 7, 8, 10, and 11.
Restarting your laptop helps eliminate potential software glitches. For most personal laptops, to restart, simply move the cursor to the Start menu, select the Power button, and choose the Restart option from the displayed menu.
/fptshop.com.vn/uploads/images/tin-tuc/179629/Originals/camera-laptop-bi-loi-nguyen-nhan-do-dau-va-lam-cach-nao-de-khac-phuc-hieu-qua2.jpg)
In addition to the above method, you can also use the keyboard shortcut Alt + F4 to open the Shutdown Windows dialog box. Select Restart and click OK. Your computer will begin the restart process. After the laptop has restarted, check if the camera issue persists, and if so, try the next troubleshooting step.
/fptshop.com.vn/uploads/images/tin-tuc/179629/Originals/camera-laptop-bi-loi-nguyen-nhan-do-dau-va-lam-cach-nao-de-khac-phuc-hieu-qua3.jpg)
See also: 5 Methods to Fix Camera Not Working on Windows 11
Check the Physical Button/Shutter
Modern laptops often feature a physical button or shutter to toggle the camera on or off. Therefore, if your laptop’s camera is malfunctioning, carefully inspect these components to ensure they are not the cause of the issue. Typically, the laptop camera shutter is located next to the camera and covers the lens when the laptop is closed.
/fptshop.com.vn/uploads/images/tin-tuc/179629/Originals/camera-laptop-bi-loi-nguyen-nhan-do-dau-va-lam-cach-nao-de-khac-phuc-hieu-qua4.jpg)
Furthermore, the physical button controlling the laptop’s camera may be located within the Fn key row on the keyboard. Laptop manufacturers usually print a camera icon on the corresponding key for easy identification and use.
/fptshop.com.vn/uploads/images/tin-tuc/179629/Originals/camera-laptop-bi-loi-nguyen-nhan-do-dau-va-lam-cach-nao-de-khac-phuc-hieu-qua5.jpg)
Additionally, some laptop models have an on/off switch for the camera located on the side of the device. If you find any physical buttons related to the camera, check them to ensure they are not preventing the camera from activating when needed.
/fptshop.com.vn/uploads/images/tin-tuc/179629/Originals/camera-laptop-bi-loi-nguyen-nhan-do-dau-va-lam-cach-nao-de-khac-phuc-hieu-qua6.jpg)
Run the Camera Troubleshooting Tool
Laptops running the Windows 11 operating system usually have a built-in troubleshooting feature that helps users find and fix any camera-related issues. To launch this feature:
Step 1: Access the Settings menu from the Start menu or use the keyboard shortcut Windows + I.
/fptshop.com.vn/uploads/images/tin-tuc/179629/Originals/camera-laptop-bi-loi-nguyen-nhan-do-dau-va-lam-cach-nao-de-khac-phuc-hieu-qua7.jpg)
Step 2: In the left pane of the application window, select the Bluetooth & devices tab.
/fptshop.com.vn/uploads/images/tin-tuc/179629/Originals/camera-laptop-bi-loi-nguyen-nhan-do-dau-va-lam-cach-nao-de-khac-phuc-hieu-qua8.jpg)
Step 3: Next, select the Cameras option.
/fptshop.com.vn/uploads/images/tin-tuc/179629/Originals/camera-laptop-bi-loi-nguyen-nhan-do-dau-va-lam-cach-nao-de-khac-phuc-hieu-qua9.jpg)
Step 4: Click on the webcam displayed in the Connected cameras section.
/fptshop.com.vn/uploads/images/tin-tuc/179629/Originals/camera-laptop-bi-loi-nguyen-nhan-do-dau-va-lam-cach-nao-de-khac-phuc-hieu-qua10.jpg)
Step 5: Then, click on the Troubleshoot option.
/fptshop.com.vn/uploads/images/tin-tuc/179629/Originals/camera-laptop-bi-loi-nguyen-nhan-do-dau-va-lam-cach-nao-de-khac-phuc-hieu-qua11.jpg)
Step 6: A troubleshooting window will now appear. Follow the on-screen instructions to troubleshoot your faulty laptop camera.
/fptshop.com.vn/uploads/images/tin-tuc/179629/Originals/camera-laptop-bi-loi-nguyen-nhan-do-dau-va-lam-cach-nao-de-khac-phuc-hieu-qua12.jpg)
Check the Camera Privacy Settings on Your Laptop
If your laptop’s camera is not working in certain applications, you should check the privacy settings configured on your laptop to resolve the issue.
Step 1: First, access the Settings menu in Start or use the keyboard shortcut Windows + I.
- Restart your laptop, as this can resolve potential software glitches.
- Inspect the physical button or shutter of the camera to ensure they are not causing the issue.
- Run the built-in camera troubleshooting tool (for Windows 11) to identify and fix any camera-related problems.
- Check the camera privacy settings on your laptop to ensure the application you’re using has the necessary permissions.
Activating Privacy Mode on Pinterest Search Engine is Fast and Easy
Pinterest’s search engine now allows users to take control of their privacy, with customized settings that determine which personal information they want to share or keep private. Protecting users’ searches, this feature ensures that everyone gets an individualized search experience, without being affected by the activity of other users.


