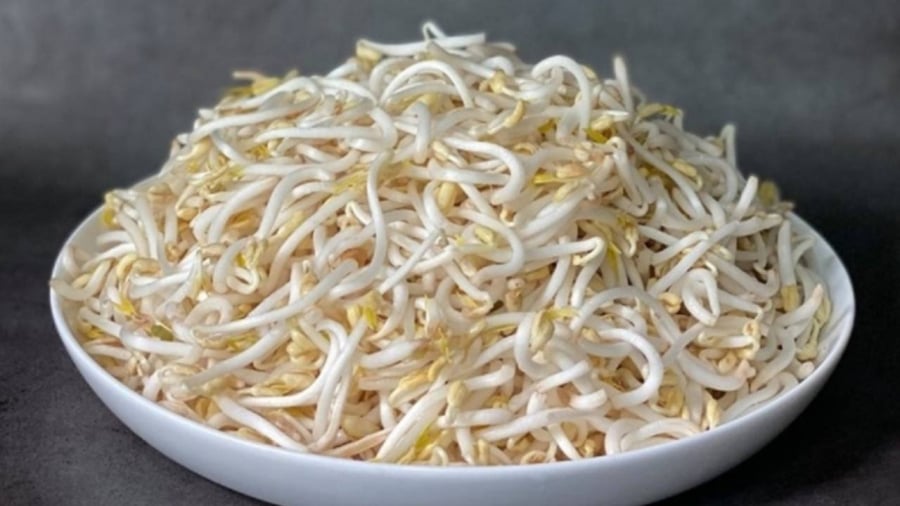
Bean sprouts are a nutritious and easily digestible food that offers a plethora of health benefits. Instead of buying bean sprouts from the market with concerns about food safety, you can easily sprout them at home with a simple process. Homemade bean sprouts are not only plump and delicious but also ensure safety, cleanliness, and nutritional value for your family.
Bean sprouts are an excellent source of vitamin C, vitamin K, folate, and fiber, benefiting the digestive and immune systems and reducing the risk of cardiovascular diseases. Additionally, they contain antioxidants that protect the body from harmful free radicals, support skin health, and aid in maintaining a healthy figure.
Sprouting your own bean sprouts at home is not only cost-effective but also allows you to control the quality and avoid unwanted chemicals and growth stimulants.

Bean Sprouts
**Ingredients and Tools:**
– Green beans: 100g (choose plump, undamaged beans without wormholes)
– Clean water: Use filtered or boiled and cooled water
– Cloth or towel: To cover the beans during the sprouting process
– Basket or container: Use a plastic basket with drainage holes or a glass jar with a lid
**Step 1: Soak the Green Beans**
Before sprouting, soak the green beans to stimulate germination. Soak the beans in clean water at a ratio of 1 part beans to 3 parts water.
For best results, use warm water at around 30-35°C. Soak the beans for 6-8 hours or overnight. This helps the beans absorb water, soften, and prepare for sprouting.
After soaking, rinse the beans and discard any that float to the surface as they are likely damaged and won’t sprout.
**Step 2: Prepare Tools and Sprout the Beans**
After soaking the beans, follow these steps:
– Prepare a basket or container: Place a damp cloth or towel at the bottom of the basket or container. This will help maintain moisture during the sprouting process.
– Spread the beans evenly: Create a thin layer of beans, ensuring they don’t overlap too much, to provide sufficient space and light for their growth.
– Cover with a damp cloth: After spreading the beans, cover them with another damp cloth. Ensure the cloth remains moist but not soaking to prevent the beans from getting waterlogged.
– Cover and keep in a cool, dark place: Place the basket or container of beans in a dark area, away from direct light. You can keep them in a kitchen corner or inside a cabinet to avoid dryness and promote faster growth.
**Step 3: Water the Sprouts Daily**
For optimal growth, water the sprouts regularly:
– Water 2-3 times a day: Morning, noon, and night, use clean water to sprinkle on the sprouts. Each time, uncover the cloth, rinse the sprouts thoroughly, and then drain the excess water before covering again. Be careful not to soak the beans for too long, as this may cause waterlogging and rot.
– Keep the cloth moist: If the cloth dries out, mist it to maintain moisture and encourage robust growth. However, avoid over-wetting the cloth to prevent rot and spoilage.
**Step 4: Harvest the Bean Sprouts**
After 2-3 days of sprouting, the bean sprouts will be ready to harvest when they are about 4-5 cm long.
Toing: Simply rinse the sprouts under cold running water to remove the bean husks and any dirt. Then, let them air dry, and they are ready to be used in various dishes.
Storage: If you don’t use all the sprouts immediately, store them in the refrigerator crisper for 2-3 days. Since homemade sprouts are free from preservatives, they will spoil faster than store-bought ones, so it’s best to consume them within a few days to ensure freshness and nutritional value.
**Tips for Plump, Delicious, and Safe Bean Sprouts:**
– Choose high-quality green beans: Select undamaged, whole green beans without wormholes for a higher germination rate and plumper sprouts.
– Maintain proper moisture: During the sprouting process, ensure the cloth remains moist but not soaked, and regularly water the sprouts to maintain moisture.
– Avoid direct light: Bean sprouts thrive in a dark and cool environment. Excessive exposure to light may turn them green and slender.
Sprouting your own bean sprouts at home is not only simple and economical but also ensures food safety. With these step-by-step instructions, you can easily produce fresh, plump, and nutritious sproutssection bean sprouts for your family’s meals. Enjoy using them in salads, stir-fries, soups, and more to enhance the variety and nutritional profile of your daily meals!
Superfood Veggie Stir Fry: A Tasty Dish to Nourish Your Liver and Kidneys
With a bunch of fresh green chives and some mushrooms, you have the makings of a simple, delicious, and nutritious stir-fry. This quick and easy dish is a fantastic way to get your daily dose of veggies and is perfect for a busy weeknight dinner or a lazy weekend lunch. The combination of the slightly onion-y chives and the earthy mushrooms creates a flavor profile that is both satisfying and healthy. So, with just a few simple ingredients, you can create a dish that is not only good for you but also tastes amazing.
Should You Use Meat Broth for Soup or Discard It?
Meat broth is a versatile liquid that can be used in a myriad of ways. While some people choose to discard it due to its high fat content, others recognize its potential as a flavorful base for vegetable soups or other culinary creations. The question arises: What is the best way to utilize meat broth?
The Secret to Choosing a Juicy, Sweet, and Thin-Skinned Sapodilla
Vú sữa is a popular fruit among many, but choosing a sweet and tasty one is no easy task. The art of selecting the perfect Vú sữa lies in a few key indicators; a keen eye and gentle touch will help you uncover the secrets to a delicious find.
The fruit’s appearance speaks volumes; a ripe Vú sữa boasts a vibrant yellow hue, with a hint of green at the stem. Its fragrance is another tell-tale sign, emitting a subtle, sweet aroma when ready to be enjoyed. But the true test of a Vú sữa’s ripeness is in its feel. A gentle squeeze will reveal a slight give, indicating the fruit is at its prime, ready to be savored.
With these simple tricks, you’ll be on your way to becoming a Vú sữa connoisseur, impressing your friends and family with your ability to select the finest fruits.


