


1. Benefits of Excel file locking
First, let’s explore the benefits of locking Excel files. Here are some common situations where locking Excel files can help you:
- Protecting personal information: Sometimes, you may store personal or sensitive data in Excel files. File locking prevents others from accessing this information.
- Ensuring data integrity: Locking Excel files also ensures that the data you create is not unintentionally changed.
- Managing document sharing: When you share Excel files with others, file locking ensures that they only have viewing rights and cannot edit or copy the data.
/fptshop.com.vn/uploads/images/tin-tuc/59093/Originals/huong-dan-cach-dat-password-cho-file-excel-1.png)
2. How to lock Excel files
2.1. Locking Excel Files
Step 1: Open the Excel file you want to lock.
/fptshop.com.vn/uploads/images/tin-tuc/59093/Originals/huong-dan-cach-dat-password-cho-file-excel-2.jpg)
Step 2: Next, click on Save As.
/fptshop.com.vn/uploads/images/tin-tuc/59093/Originals/huong-dan-cach-dat-password-cho-file-excel-3.jpg)
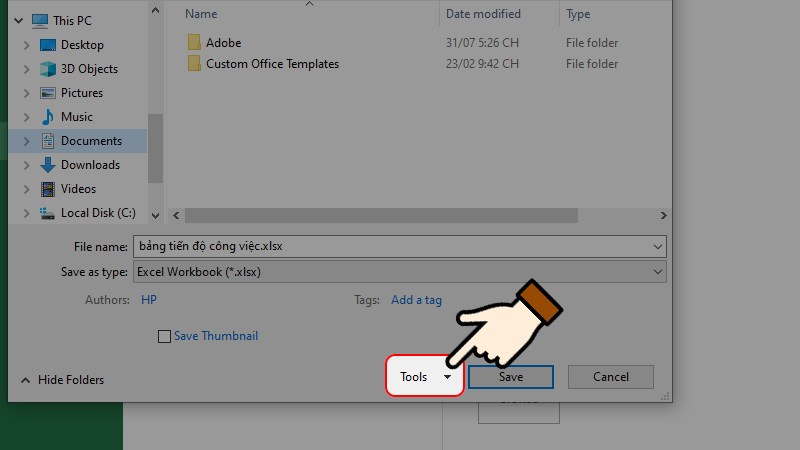
Step 3: The Save As dialog box will appear, you need to select the file location. Then, click on the Tools button as shown in the image.
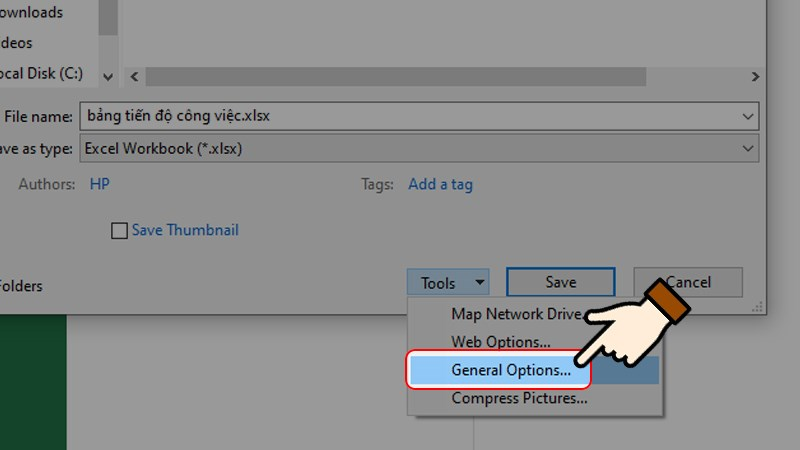
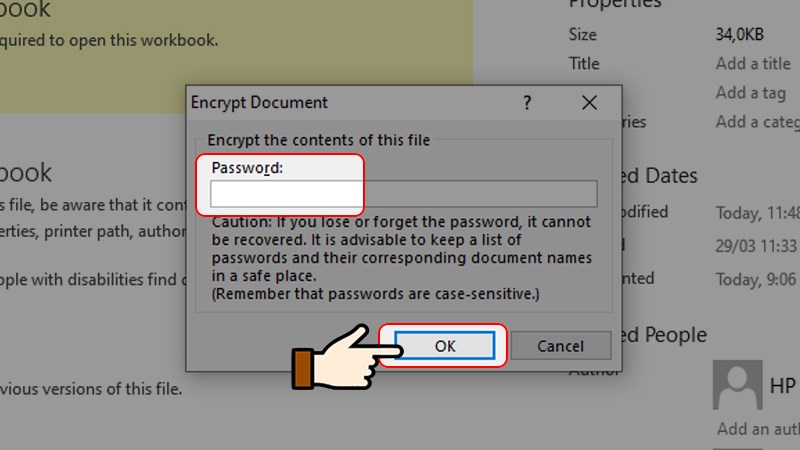
Step 4: Next, click on General Options.
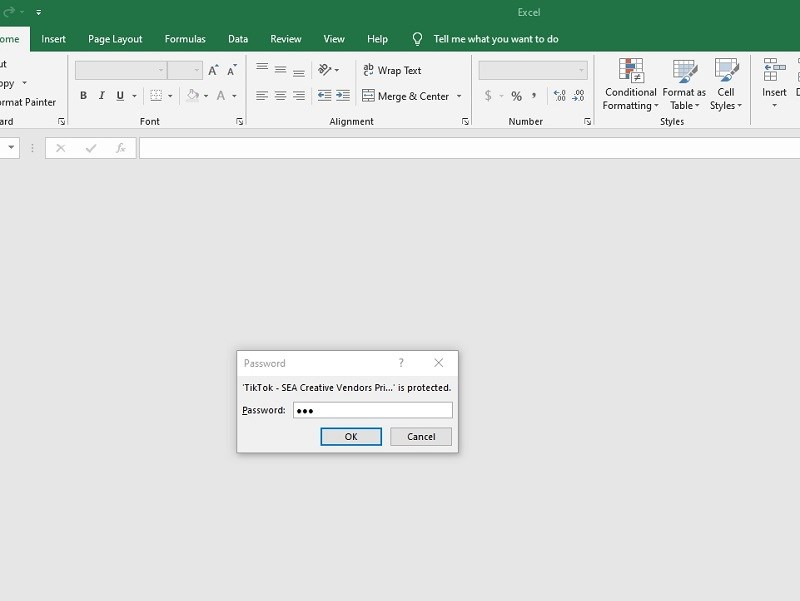
Step 5: Now, the system will display an interface for you to set a password for opening the Excel file.

2.2. How to remove a password when an Excel file is locked:
Step 1: Open the locked Excel file.
Step 2: Enter the password.
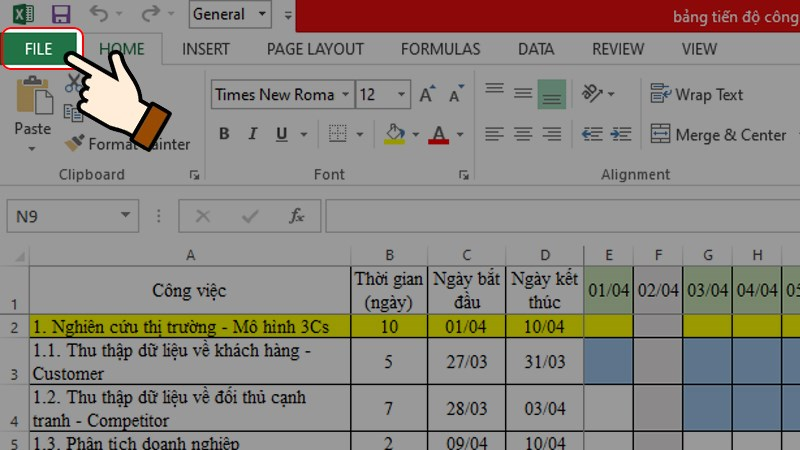
Step 3: Select “File”
Step 4: Select “Encrypt with Password” and remove the password.
Step 5: The Save As dialog box will appear on the screen, click on the Tools button as shown in the image.
/fptshop.com.vn/uploads/images/tin-tuc/59093/Originals/huong-dan-cach-dat-password-cho-file-excel-7.jpg)
Step 6: Next, click on General Options.

Step 7: Now, simply uncheck the box next to Locked > Click on OK.
/fptshop.com.vn/uploads/images/tin-tuc/59093/Originals/huong-dan-cach-dat-password-cho-file-excel-11.jpg)
3. Using Protect Workbook to lock Excel files
3.1. Locking Excel files with Protect Workbook:
Step 1: Open the Excel file.
/fptshop.com.vn/uploads/images/tin-tuc/59093/Originals/huong-dan-cach-dat-password-cho-file-excel-12.jpg)
Step 2: Select “File” and then “Protect Workbook.”
Step 3: Select “Mark as Final” to lock the file.
/fptshop.com.vn/uploads/images/tin-tuc/59093/Originals/huong-dan-cach-dat-password-cho-file-excel-14.jpg)
3.2. How to remove a password when an Excel file is locked using Protect Workbook:
Step 1: Open the locked Excel file, then enter the password.
Step 2: Select “File”.

Step 3: Select “Protect Workbook” > Choose Encrypt with Password.
/fptshop.com.vn/uploads/images/tin-tuc/59093/Originals/huong-dan-cach-dat-password-cho-file-excel-16(1).jpg)
Step 4: Remove the password you set for the Excel file > Click on OK.
4. How to lock an Excel sheet
4.1. Setting a password to lock a sheet:
Step 1: Select the sheet you want to lock, then right-click and choose “Format Cells.”
/fptshop.com.vn/uploads/images/tin-tuc/59093/Originals/huong-dan-cach-dat-password-cho-file-excel-18.jpg)
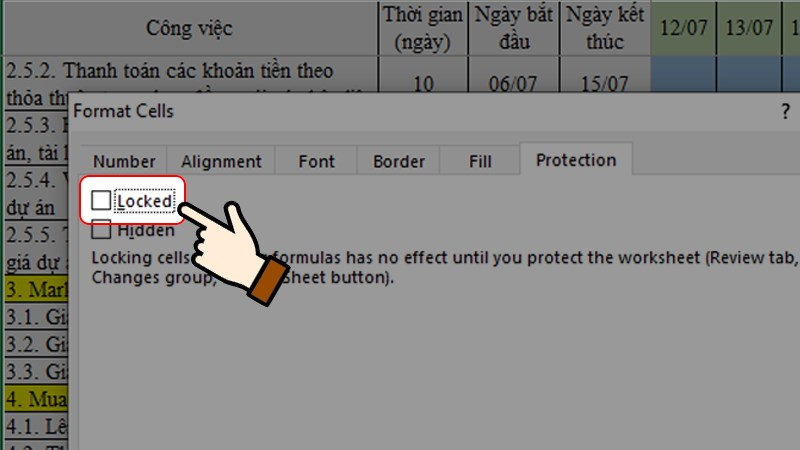
Step 2: In the Protection tab, uncheck the Locked box, then click on OK.
Step 3: Select the Excel data range you want to lock, right-click and choose Format Cells…
/fptshop.com.vn/uploads/images/tin-tuc/59093/Originals/huong-dan-cach-dat-password-cho-file-excel-25.jpg)
Step 4: In the Protection tab, check the Locked box again > Click OK.
/fptshop.com.vn/uploads/images/tin-tuc/59093/Originals/huong-dan-cach-dat-password-cho-file-excel-26.jpg)
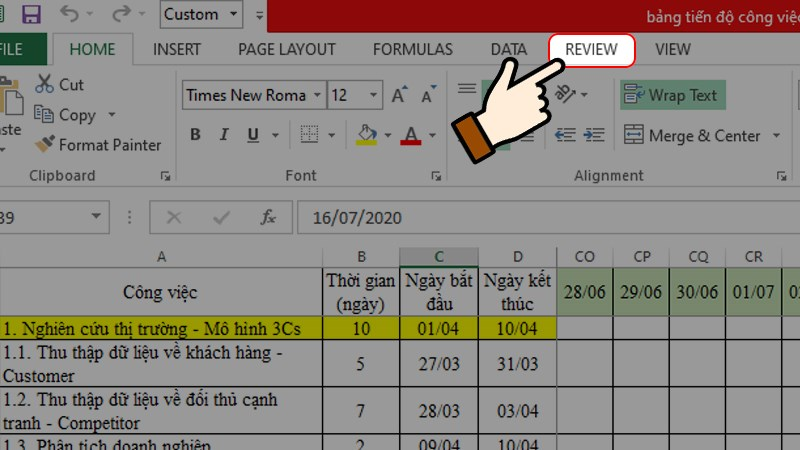
Step 5: Click on Review > Choose Allow Users to Edit Ranges/ Allow Edit Ranges.
/fptshop.com.vn/uploads/images/tin-tuc/59093/Originals/huong-dan-cach-dat-password-cho-file-excel-27.jpg)
Step 6: In the dialog box that appears, click on New.
/fptshop.com.vn/uploads/images/tin-tuc/59093/Originals/huong-dan-cach-dat-password-cho-file-excel-28.jpg)
Step 7: Next, enter a password for the range to be locked as shown below > Click OK.
/fptshop.com.vn/uploads/images/tin-tuc/59093/Originals/huong-dan-cach-dat-password-cho-file-excel-29.jpg)
Step 8: You will be asked to re-enter the password for confirmation > Click OK.

5.2. How to remove a password when a data range is locked:
Step 1: Select the data range that is locked, then right-click and choose Review.
/fptshop.com.vn/uploads/images/tin-tuc/59093/Originals/huong-dan-cach-dat-password-cho-file-excel-33.jpg)
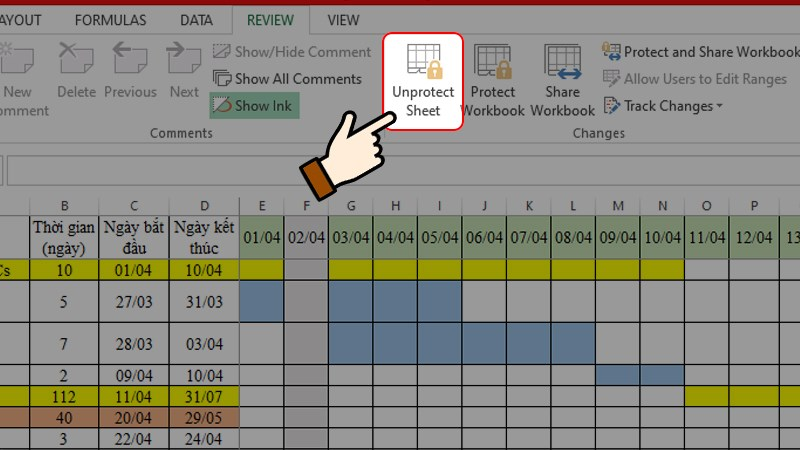
Step 2: Click on Unprotect Sheet to remove the created lock.
/fptshop.com.vn/uploads/images/tin-tuc/59093/Originals/huong-dan-cach-dat-password-cho-file-excel-34.jpg)
Step 3: Next, enter the password you created for that range, then click OK.
/fptshop.com.vn/uploads/images/tin-tuc/59093/Originals/huong-dan-cach-dat-password-cho-file-excel-35.jpg)
5. Locking a data range in Excel
5.1. Setting a password to lock a data range:
Step 1: Select the data range you want to lock, then right-click and choose “Format Cells.”
/fptshop.com.vn/uploads/images/tin-tuc/59093/Originals/huong-dan-cach-dat-password-cho-file-excel-23.jpg)
Step 2: In the Protection tab, uncheck the Locked box, then click on OK.
Step 3: Select the Excel data range you want to lock, right-click, and choose Format Cells…
Step 4: In the Protection tab, check the Locked box again > Click OK.
Step 5: Click on Review > Choose Allow Users to Edit Ranges/ Allow Edit Ranges.
Step 6: In the dialog box that appears, click on New.
Step 7: Next, enter a password for the range to be locked as shown below > Click OK.
Step 8: You will be asked to re-enter the password for confirmation > Click OK.
/fptshop.com.vn/uploads/images/tin-tuc/59093/Originals/huong-dan-cach-dat-password-cho-file-excel-32.jpg)
5.2. How to remove a password when a data range is locked:
Step 1: Select the locked data range, then right-click and choose Review.
Step 2: Click on Unprotect Sheet to remove the created lock.
Step 3: Enter the password you created for that range, then click OK.
Conclusion
Locking Excel files is an important security measure to ensure the protection of your important data. Whether you use Excel for personal or work purposes, knowing how to perform file locking methods is crucial. Mastering these techniques helps you efficiently protect your information and documents.
Top 12 Best and User-Friendly Word to PDF Conversion Software for Office Professionals

The Word to PDF converter software is a useful tool that allows users to share and print documents while preserving the original formatting. FPT Shop introduces the top 12 best Word to PDF conversion software, which has the ability to convert files easily and quickly.
How to easily delete your TikTok account in just a snap

If you’re looking for a simple and fast way to delete your TikTok account, then don’t miss out on the following article.
The Ultimate Guide to Enabling Safe Search on Google

In today’s digital age, searching on Google has become an integral part of our daily lives. However, ensuring safety and protecting personal information is crucial, which is why enabling safe search mode on Google is of utmost importance. In this article, we will explore how to activate this feature and enjoy a secure searching experience on this popular online platform.
Solving the mystery: What is the passcode for VNeID? Can the passcode of VNeID be changed?

“What is the passcode for VNeID?” – Not only does this question capture the attention of VNeID app users, but it is also the first step in understanding this important security feature. This article will clarify any queries regarding the passcode for VNeID and how to set it up for changes.


