


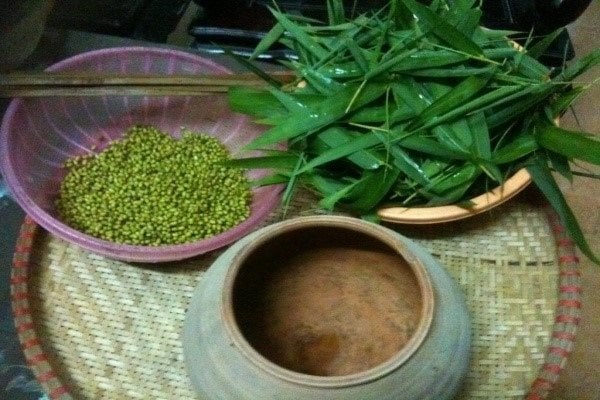
Preparing the ingredients
– Terracotta pot: 24-28cm
– Bamboo tray: 2 pieces from 20-28cm
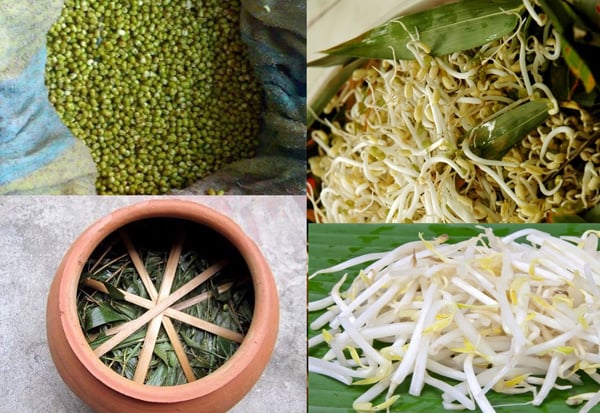
– Green beans: 200g
– Bamboo leaves: 1-2 handfuls
– Bamboo stick: 3 sticks, suitable length for the terracotta pot
How to make giá đỗ (fermented bean sprouts)
Soaking the beans
– You pour 150 – 200g green beans into a container, wash them thoroughly and rub them, then put them in the terracotta pot and pour water to soak them. In the summer, you can soak them for 6-8 hours with room temperature water. If soaking with warm water at about 35-40 degrees Celsius, it takes 4-6 hours. In the winter, you should increase the soaking time to 1-2 hours. After soaking, you rinse them once again and then leave them on the tray for 10-20 minutes to drain.
Cleaning the terracotta pot
– You put the beans into the pot, spread them evenly, and use the first bamboo tray to cover the beans (the roots will cling to this tray, so you need to spread the beans in a way that fits the tray, without overflowing the edges to prevent the beans and roots from growing too long.
– You should use a smaller or equal-sized tray than the mouth of the pot to remove the bean sprouts.
Cleaning the bamboo leaves and placing them on top
– Next, you clean the bamboo leaves and place them on top of the terracotta pot. The bamboo leaves will stimulate germination and create darkness. The amount of bamboo leaves should be just enough, not too much or too little.
– If there aren’t enough bamboo leaves, you can use 1 additional layer of banana leaves. If you can’t find bamboo leaves, you can use 4-5 layers of banana leaves or dong leaves. These types of leaves don’t rot when soaked in water, so they won’t affect the quality of the bean sprouts.
– Now, you use the second bamboo tray to cover the pot and secure it with bamboo sticks. Then, turn the pot upside down, wait for 4-6 hours, and let the sprouts drink water.
Let the sprouts drink water
– In the fourth step, you pour water into the pot and then drain it. Then, fill the pot with water again and soak for 15-30 minutes. After that, pour water and turn the pot upside down for 6-8 hours before letting the sprouts drink the next batch of water. Remember to schedule regular watering for the sprouts, 3-4 times a day.
Loosen the bamboo sticks
– When the sprouts have been fermented for 36-48 hours, you loosen the bamboo sticks to make the sprouts longer. If you want longer sprouts, loosen the bamboo sticks once again after 72 hours.
Harvest the bean sprouts
– After 72 hours, the sprouts are ready to be harvested. Now, you remove the bamboo sticks, the bamboo tray, take out the bamboo leaves, discard the withered leaves, wash them clean, and let them dry for reuse.
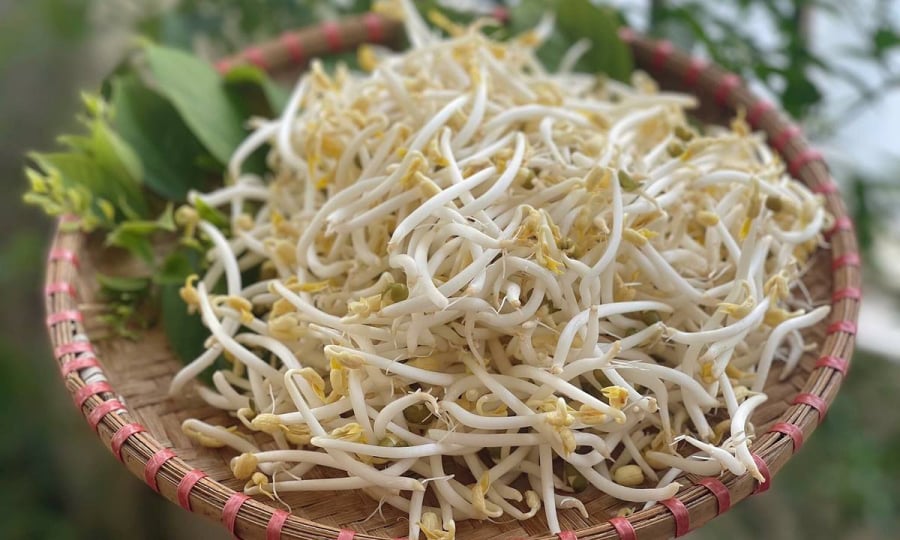
– Gently remove the tray of bean sprouts, remove the sprouts, use a sieve to remove the bean skins that have fallen, put the sprouts in a black bag, and store them in the refrigerator.
– Clean the bean skins and dry them, they can be used as pillow stuffing.
Tips for making bean sprouts
200g of beans will yield 1.3-1.5kg of bean sprouts, and good-quality bean sprouts will have the sprout heads not yet emerged from the beans, regardless of whether they are long or short.
Comparing the Benefits of Peeled and Unpeeled Green Beans

Have you ever been left wondering if you should peel mung beans before you cook them? For years this has been a mystery to many, but don’t worry – here we will reveal the definite answer to the great debate! Read on to find out the secret behind preparing mung beans.
3 Effective Papaya Remedies for Acne That Will Leave You Hooked

Papaya is a highly nutritious fruit that not many people are aware of its acne-fighting properties. Apart from providing health benefits, this fruit has proven to be extremely effective in treating acne.
Tips: Give your indoor plants a fresh new look with nail polish

The cute potted plants that you personally paint will make your garden even more lovely, not to mention that you can creatively give them as unique and interesting gifts to your friends.
Cooking corn kernels with this extra step removes all the stickiness, enhances the flavor, and makes it irresistibly delicious.

When boiling peanuts, use this recipe to make them more tender, flavorful, and delicious.
Surprising Discovery: Seed Plant Turns Out to Be Delicious and Beneficial for Liver Detox

This is a type of vegetable that has a refreshing, crispy taste and is beneficial for health. It has detoxifying properties, supports liver health, and improves vision.


