


Ingredients
– Coconut meat: 1 kg
– White sugar
– 50ml unsweetened fresh milk and vanilla extract
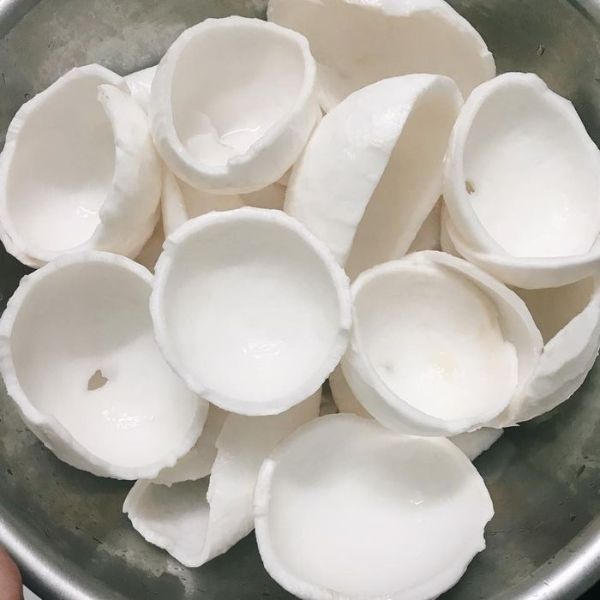
Note: If you want to make coconut fiber or coconut balls, it is recommended to choose mature coconuts, which are not too young or too old, with the right hardness and chewiness, which are very suitable for shredding or shaping into balls.
Tools
– Regular bowl, knife, spoon, cutting board…
– Basket, grater…
– Wide pan
Traditional coconut candy ingredients
How to make traditional coconut candy
Step 1: Shred the coconut meat
Peel off the brown outer skin of the coconut. Shred the coconut meat in a circular motion to create thin, unbroken strands.
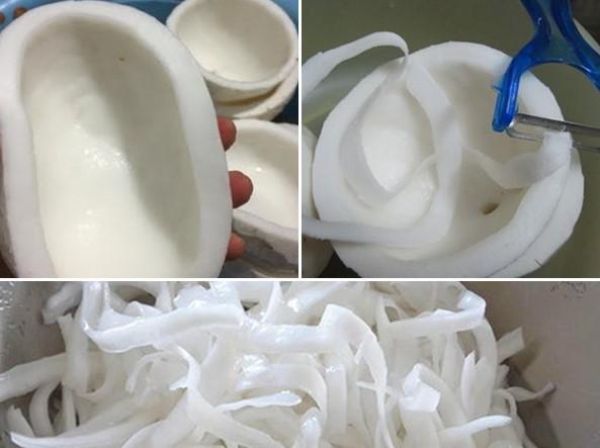
Shredded coconut meat
Step 2: Clean the coconut meat
After shredding, soak the coconut meat in water and squeeze out excess oil. Repeat this step 2-3 times. Boil a pot of water, add 1 teaspoon of salt, and blanch the coconut meat for 1 minute. Then, scoop it out and rinse it with clean water.
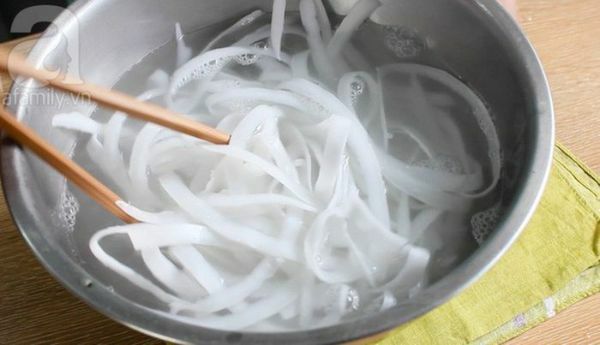
Cleaned coconut meat
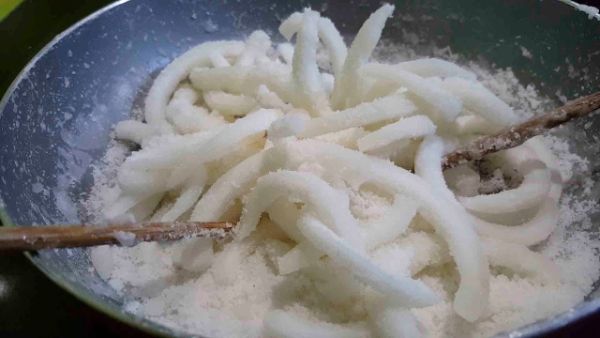
Step 3: Marinate the coconut meat with sugar
Put all the coconut meat in a deep bowl. Mix it with a ratio of 1kg coconut meat to 500g sugar. Gently stir to prevent the coconut meat from breaking. Marinate for 4-6 hours. Stir the mixture every 30 minutes until the sugar is dissolved.
Step 4: Roast the coconut meat
Heat a deep pan and add the coconut meat. Roast it over low heat, constantly stirring to prevent it from breaking, ensure even roasting, and prevent burning.
When the mixture becomes thick, add 50ml unsweetened fresh milk and a little vanilla extract for flavoring. Keep the heat low to prevent the coconut meat from turning brown. Continue roasting for 30-45 minutes until the coconut meat is dry and has a white coating. Turn off the heat and continue stirring for a while to let the coconut meat cool before removing it from the pan.
Roasted coconut meat
Spread the coconut candy on a tray and let it cool completely in a cool, airy place, preferably in the sunlight, to prevent the coconut meat from drying out completely and to maintain its firmness and beautiful white color.
How to make colorful coconut candy
A plate of colorful coconut candy will make the traditional candy plate more lively and visually appealing. The method is simple and not as difficult as many people imagine.
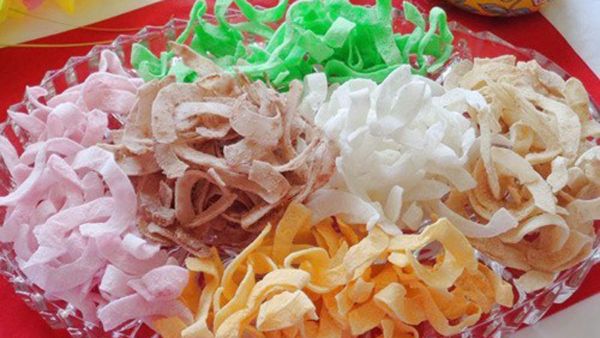
Colorful coconut candy
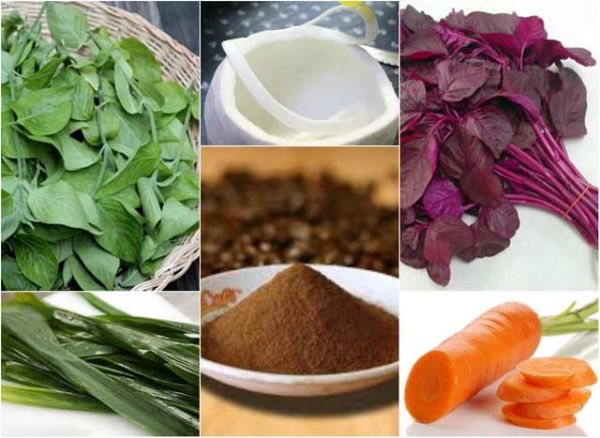
Ingredients
– 1 kg of coconut, 1 kg of white sugar
– 1 bunch of pandan leaves or matcha powder (green color)
– 3 fresh beets (red color)
– 2 carrots or 3 oranges (orange color)
– 1 purple cauliflower or 200g purple sweet potato leaves (purple color)
– 150g fresh turmeric (yellow color)
Instructions for making colorful coconut candy
Step 1: Preparing the coconut
Shred the coconut into strands, then rinse it multiple times to remove excess oil. Boil the shredded coconut with boiling water, then rinse it and let it dry.
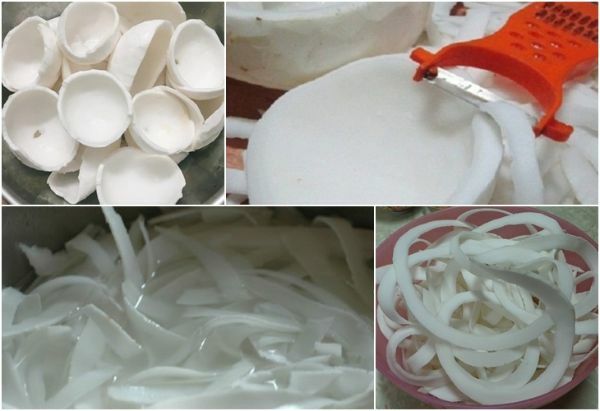
Preparing the coconut
Step 2: Creating coconut candy colors
– Green color with pandan leaves: Clean the pandan leaves, cut them into small pieces, and grind them into a paste. Use a cloth to filter and collect the juice, removing any residues. If using matcha powder, dissolve it in 10ml of water.
– Pink color with beets: Peel the beets, grind them into a paste, and extract the juice.
– Orange color: Cut the oranges in half and extract the juice. If using carrots, peel and rinse them, then grind them into a paste and extract the juice.
– Purple color with purple cauliflower: Blanch the purple cauliflower leaves in 1 liter of boiling water. Strain the liquid to remove any impurities. If using purple sweet potato leaves, grind them into a paste and extract the juice.
– Yellow color with fresh turmeric: Peel the fresh turmeric, grind it into a paste, and extract the juice.
Creating coconut candy colors
Step 3: Soaking the ingredients in the colors
Mix the shredded coconut with sugar and divide it into 5 equal parts. Add the colored juice to each part and mix well. Let the ingredients soak in the sugar and color for about 4-6 hours overnight.
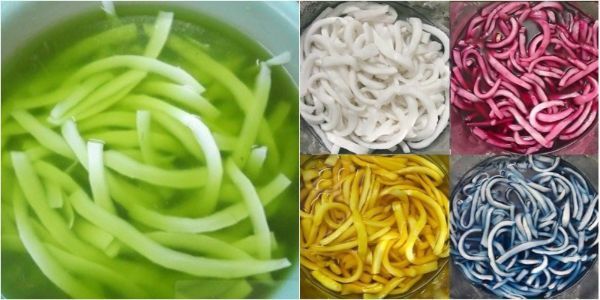
Soaking the ingredients in the colors
Step 4: Roasting the coconut candy
Use a wide pan to roast each color separately. Roast over low heat until the coconut candy has a powdery texture similar to the color of the juice. Let it cool completely and you will have colorful coconut candy.

Roasting the colorful coconut candy
Note: Roast each color separately to prevent the colors from mixing.
Above are simple ways to make homemade coconut candy that you can refer to in order to make a delicious and beautiful plate of coconut candy for the upcoming Tet holiday.
Good luck!
The Most Common Issue with Coconut Syrup and How to “Fix” It

Many women are initially enthusiastic but later become frustrated as they stir and stir but the jam doesn’t set, or the coconut jam becomes too hard. The most common mistake people make is not achieving a crystallized sugar texture.
To prevent fruit preserves from becoming watery during the Tet holidays, remember these essential principles

The most common types of jams that tend to become runny are coconut jam and pumpkin jam. So how can we prevent jams from becoming runny during the Lunar New Year?
Delicious Homemade Coconut Jam Recipe for Tet Holiday

Coconut jam is one of the familiar traditional jams that cannot be missed during the Tet holiday. In the first few days of the new year, almost every family prepares coconut jam, peanut candy, dried mango jam, … in various colors to invite guests to come and enjoy. In fact, you can completely make delicious coconut jam at home with simple ingredients and different methods.
How to choose delicious coconut for making Tet jam

Did you know that each type of coconut jam needs to be made from different types of coconuts? Let’s explore how to choose delicious coconuts for making Tet jam!


